Phone
Required
Powers search and text receipts.

Getting Started with Rundoo · Unboxing
Handling regulars, new accounts, and walk-ins.
Every ticket starts with the same question: who's at the counter? You already know how to ring up a sale, so this is just about the left side of the transaction screen, the customer panel. In Rundoo you've got three ways to handle whoever walks up. Pull up a regular, set up a brand-new account on the spot, or skip it entirely for a cash-and-go walk-in. Here's each one, without slowing down your line.
Open Point of Sale and then Transactions in the left menu, and start on the New tab. The screen splits in two. On the left is the customer, who you're selling to. On the right is the sale itself, the cart and the total. That layout never changes, so once it clicks, every transaction feels familiar. Everything below happens on that left panel.
Click into the search bar on the left. You can search by anything on the customer's profile, their name, phone number, or email, so whatever they give you, you can find them. Click the right one and they're attached to the sale.
Watch for any note or sale reminder on the account. It pops right here when you attach them, so things like "who's authorized to charge" or "call before charging on account" catch your eye before you start scanning items.
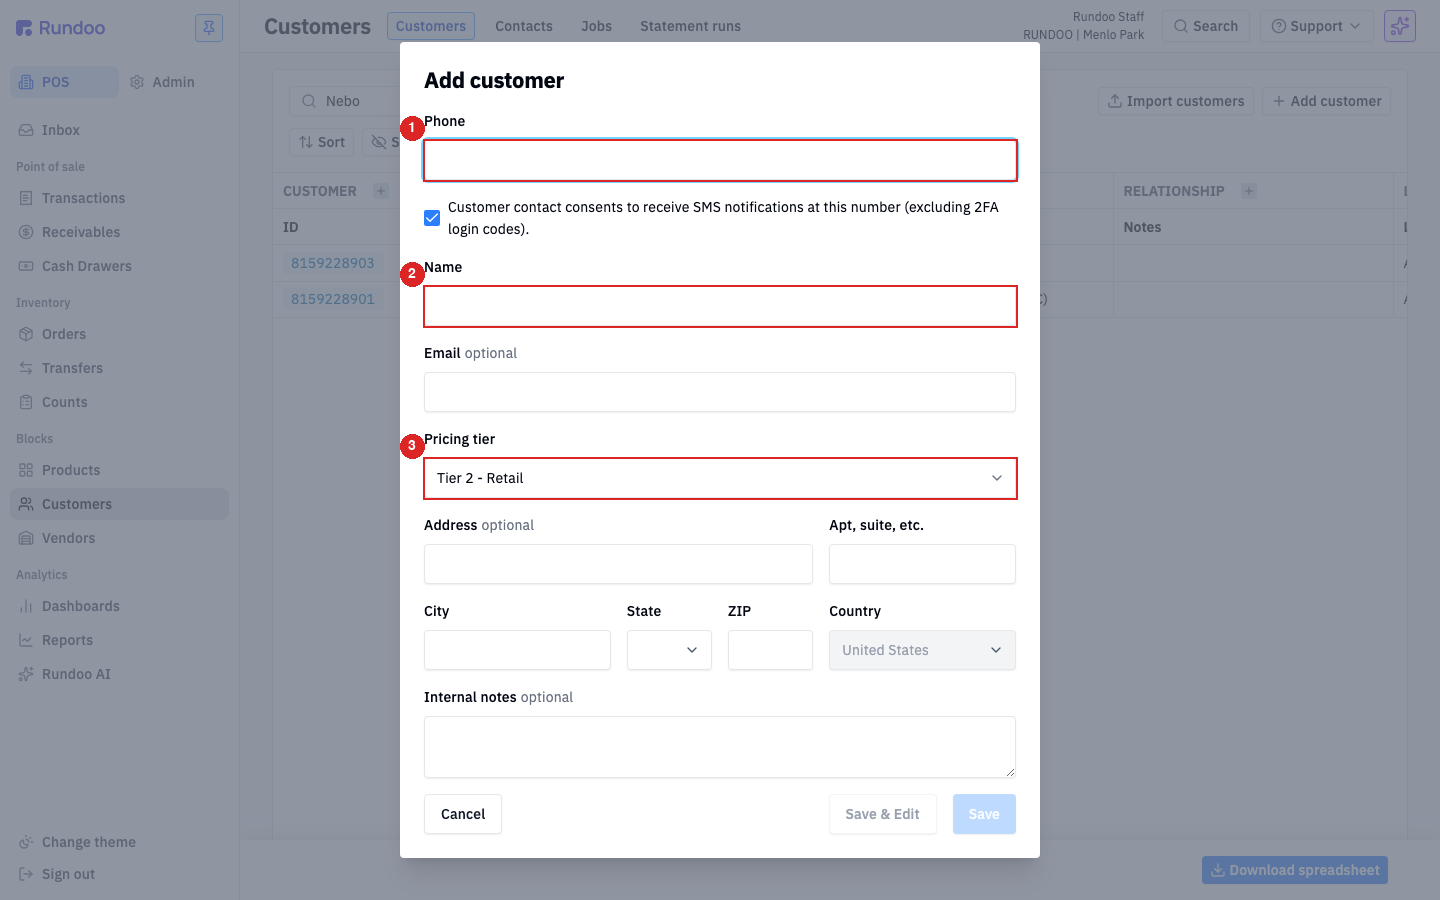
Not in the system yet? You don't have to leave the sale. Click Create account and the new-customer form opens. Enter a Phone number and a Name, the two fields that matter, so you can move fast at the counter. Email and address are optional; grab them later.
One thing worth setting right now: Pricing tier. It defaults to Tier 2 - Retail, so if this is a contractor, pick their tier here and their pricing is correct from the very first sale, with no prices to change by hand. Then click Save and they drop onto the ticket.
A quick cash-and-go walk-in who just needs a handful of hardware and no paper trail? Skip the lookup entirely. If a customer is already attached, click the × next to their name to clear the panel. Then just start adding items to the ticket and ring it up with no account at all.
Phone
Required
Powers search and text receipts.
Name
Required
Shows on receipts and in the list.
Pricing tier
Tier 2 - Retail
The default. Change it for contractors.
Email & address
Optional
Add now or come back later.
Good to know
Try it in your practice store
Pull up a regular, then set up a brand-new account just to get the timing down. Nothing in there touches your real numbers, so you can't break a thing. Next up, we build out the sale itself on the right.