Set one up
Products → Spiffs → + Add spiff
In POS mode, left sidebar.

Getting Started with Rundoo · Pricing
Pay your clerks a per-unit kickback for moving the products you want to move.
You have got a great team at the counter, and sometimes you want to give them a little extra push to move a specific product. Maybe a vendor like Benjamin Moore is funding a promotion on a line, or maybe you just have inventory you want to clear. A spiff is a per-unit kickback for your clerks, tracked right on the sale. Set the rule once, let it accrue, and pay everyone from a report at month-end.
In POS mode, click Products in the left sidebar, then click the Spiffs tab at the top. This screen lists every spiff you are running, with its name, its active dates, the per-unit amount, and a Count column.
One thing to read correctly: that Count is how many products the spiff currently covers, not how many units have sold. A spiff on a single item stays at 1 no matter how many you move. To see units sold and dollars owed, you run the reports at the end.
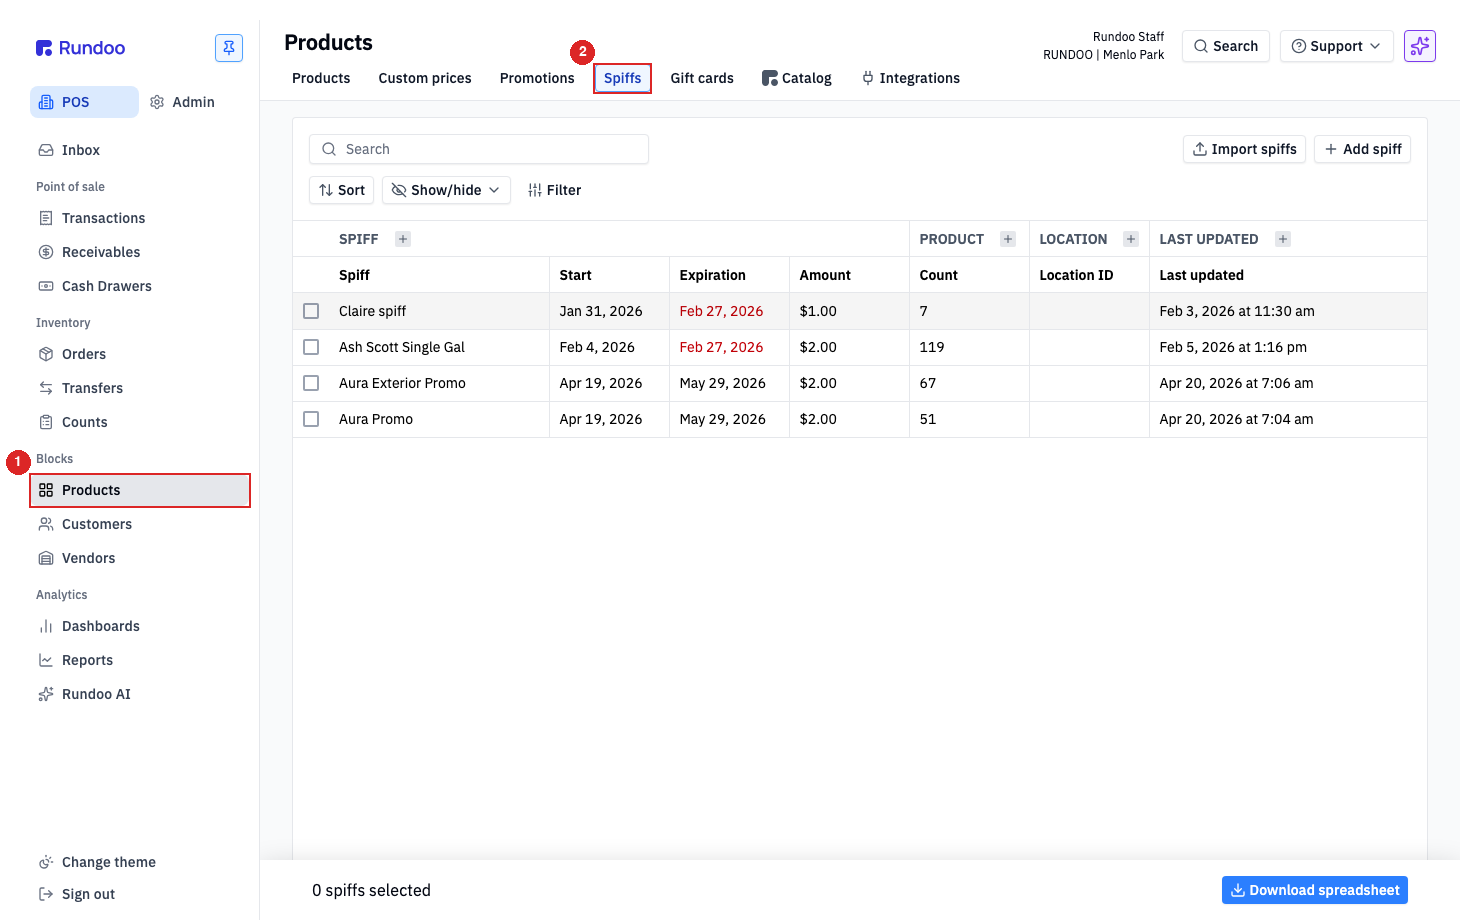
Click + Add spiff in the top-right of the list. The Add spiff form opens. Fill it top to bottom.
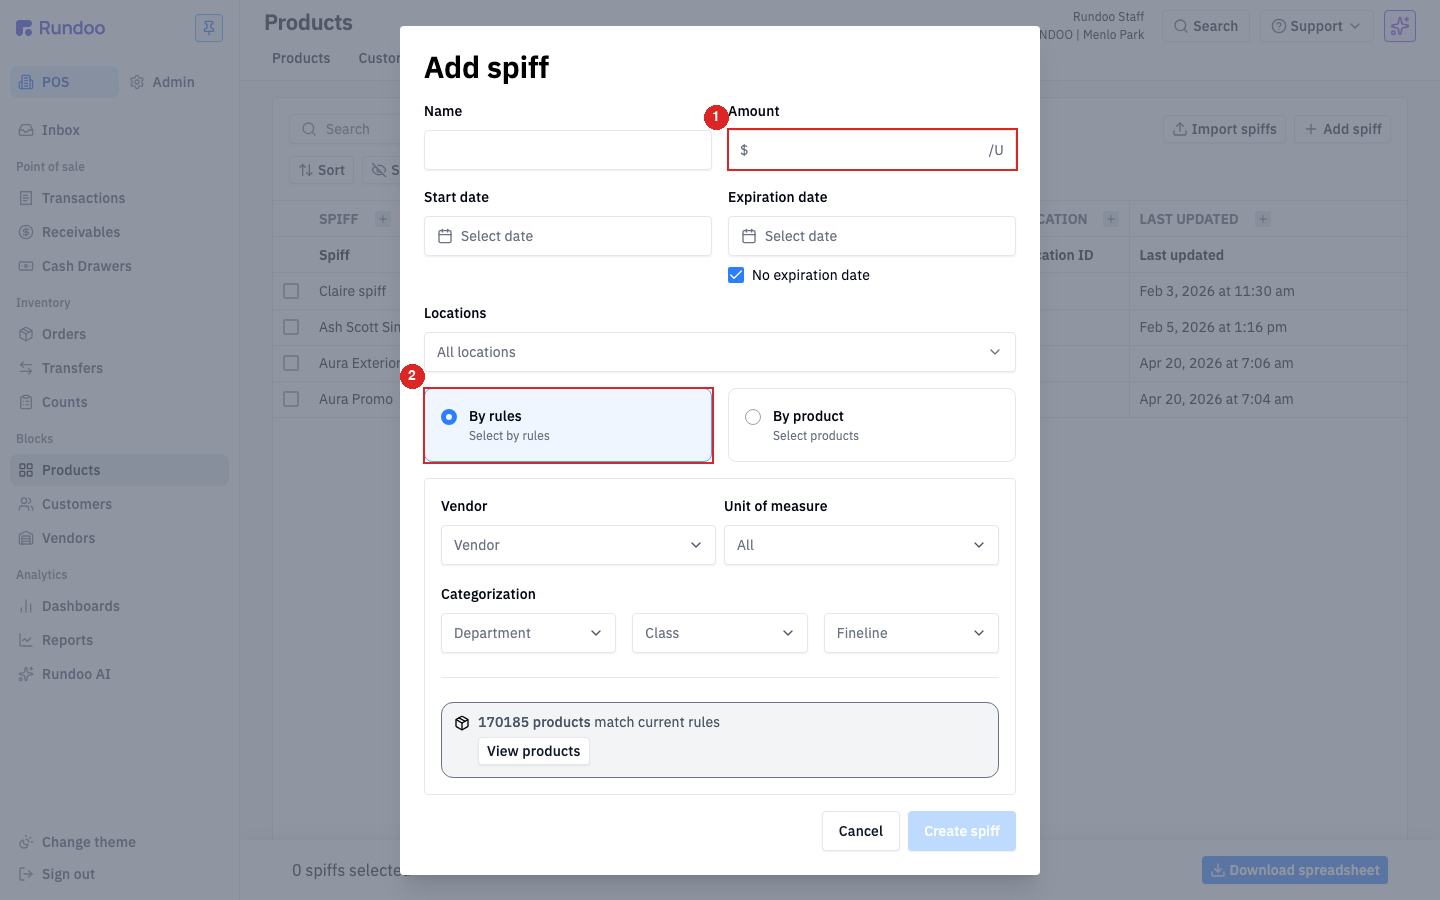
Give it a name you will recognize on your reports, like Aura Promo April. The Amount is the payout per unit. The /U suffix is the unit of measure, so $2.00 on paint means two dollars per gallon.
Set the Start date and Expiration date for the promotion window. Check No expiration date to run it open-ended until you deactivate it. Locations defaults to All locations. Narrow it only if the vendor is funding certain stores.
Most spiffs are written By rules, which catches every product matching a filter you set on Vendor, Unit of measure, Department, Class, or Fineline. For a vendor promotion, set Vendor to Benjamin Moore. As you narrow the filters, a live count shows how many products match, so you can see the blast radius before you save. Switch to By product instead when you want to hand-pick a few specific items.
This is the one to get right. If the promo is on gallons but the vendor also sells quarts, add a rule and set Unit of measure to the gallon option. Leave it on All and the spiff fires on any unit of a matching product, so you would end up paying $2 on a quart too. Watch the product count drop as you narrow it.
Click Create spiff. It lands in the list right away and starts accruing on the very next matching sale, on whoever rings it. There is no separate activate step.
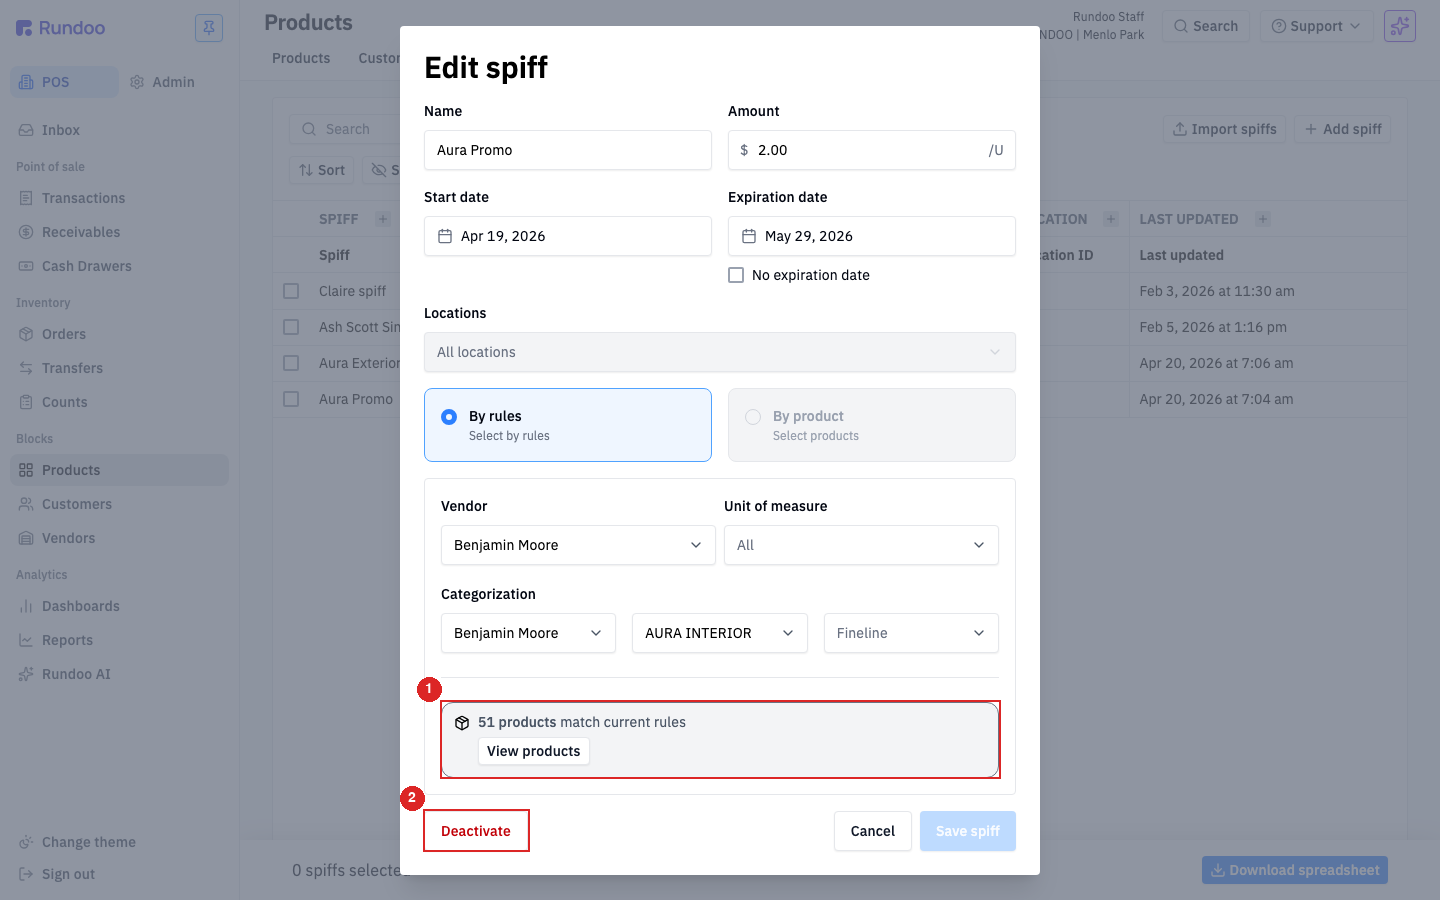
Click any row to reopen it as an Edit spiff form. Every field is editable, and View products lets you sanity-check the exact catalog slice before you save. To end a program early, click the red Deactivate button at the bottom-left. It stops new sales from accruing but keeps all the history, so the clerks you already owe stay on the report. There is no destructive delete, which is the point: once a spiff has fired, that history is money you owe.
At month-end, go to Reports in the left sidebar and look under Default reports. There are two that do the work. Spiffs by sales clerk is your payout sheet: set the date pill to Last month and it totals what each clerk earned, ready for the bookkeeper to add to payroll. Spiffs by vendor groups the same sales by vendor, so you can send a clean summary to your Benjamin Moore rep for the co-op credit.
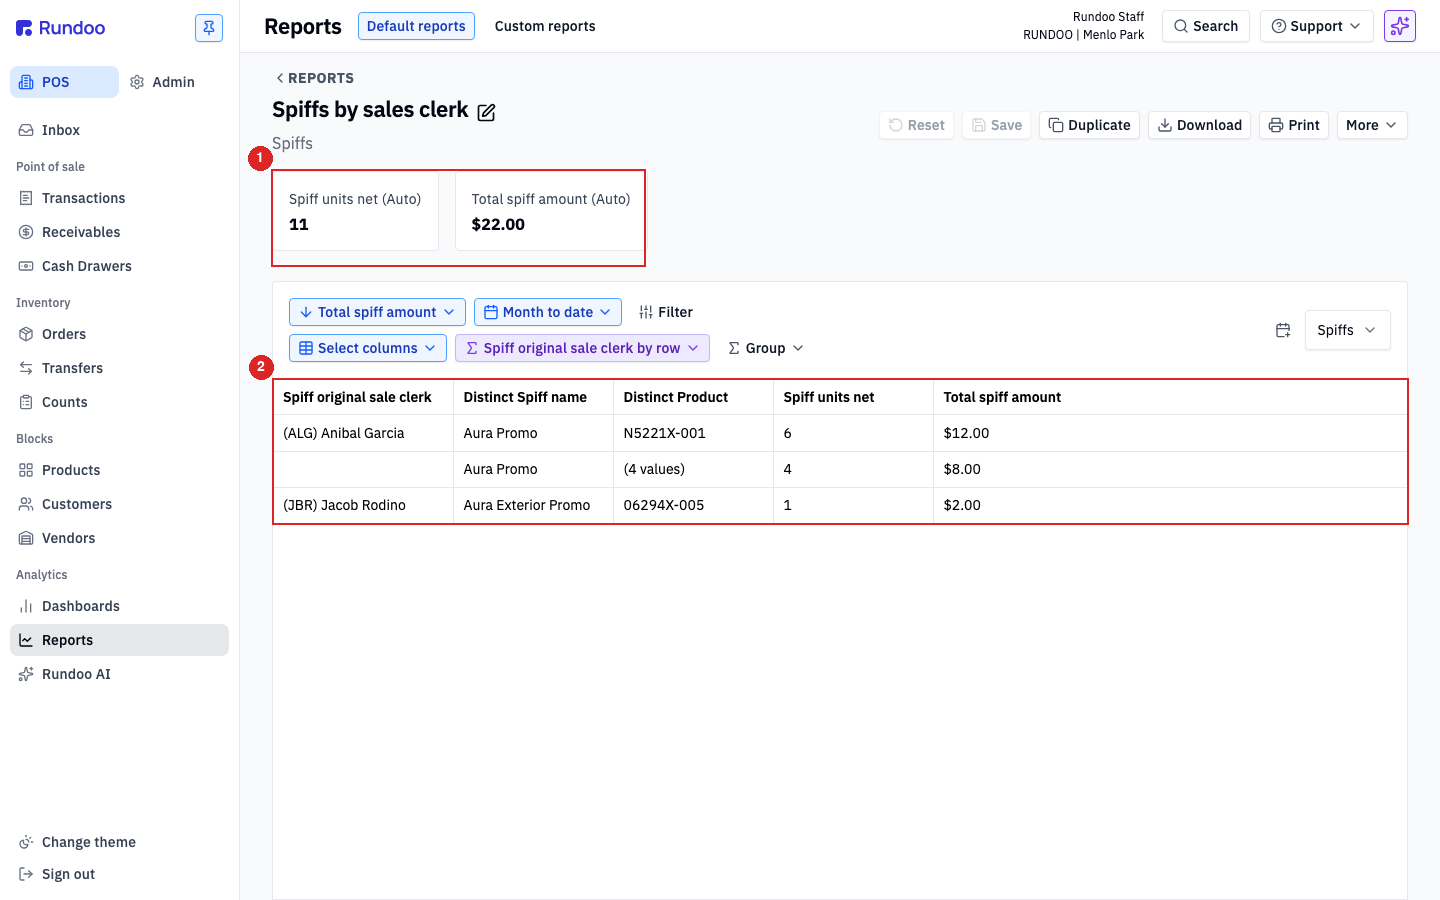
The payout goes to the designated clerk, which defaults to whoever rang the sale. If the person who actually worked the customer on the floor was not the one at the register, an admin with the right permission can reassign that credit on the sale so the right person gets rewarded. The original ringer stays on the receipt and audit trail; only the report's credit shifts.
Set one up
Products → Spiffs → + Add spiff
In POS mode, left sidebar.
Scope
By rules or By product
Rules filter a slice; by product hand-picks SKUs.
Pay clerks
Reports → Spiffs by sales clerk
Units net times amount is the payout.
Bill the vendor
Reports → Spiffs by vendor
Same sales, grouped for co-op credit.
Good to know