Chart of Accounts
Admin > Chart of Accounts > Accounts
Pre-seeded. Add accounts with Name, Type, Number.

Getting Started with Rundoo · Accounting
Set up your accounts, mapping, and cost method to match your accountant.
Getting your books set up in a new system is a big step, and it is the foundation everything else sits on. The goal is simple: make the numbers in Rundoo line up with how your accountant already tracks things, so your reports look familiar and reconciliation stays easy. Set it once, right, and it quietly does its job every day after. Here is how to get that foundation in place, and it all starts in the Admin section.
Two of the three pieces live in the same place. In Admin, open Chart of Accounts, and you will see two tabs at the top: Accounts (the list of every account in your books) and Mapping (where each kind of transaction gets pointed at the right account). The third piece, your cost method, lives one screen over on the Company tab. That is the whole tour.
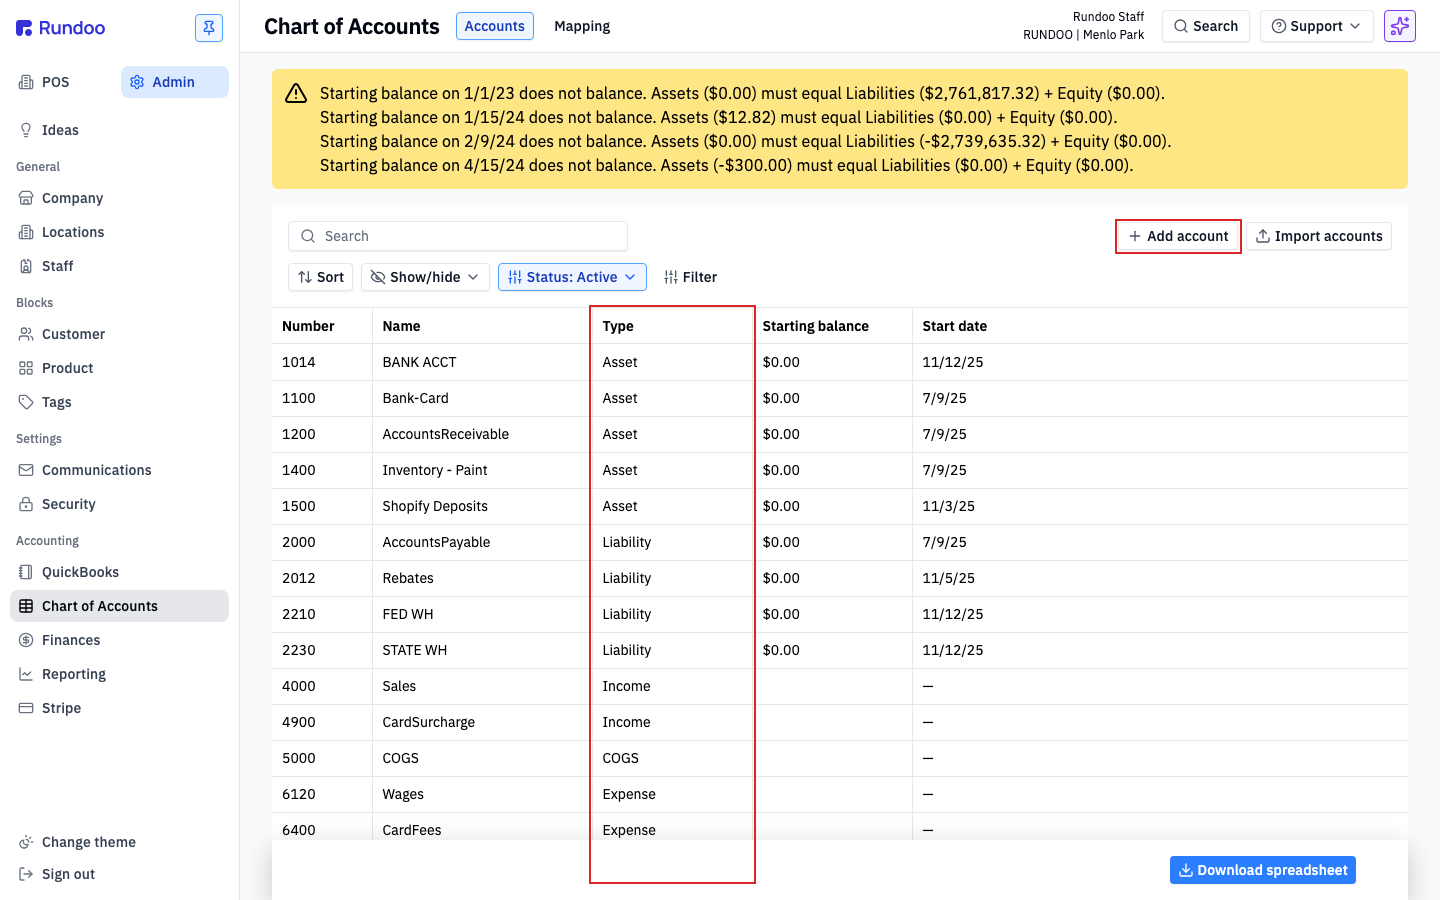
Rundoo ships every new company with a pre-seeded Chart of Accounts, so you can start ringing up sales from day one. On the Accounts tab you will already see accounts like Cash drawer, Sales, and COGS (Cost of Goods Sold), each with a number, a name, and a type. Every account is one of six types: Asset, Liability, Equity, Income, COGS, and Expense. Your Rundoo guide helps get this list to match the one you already use, so your reports read exactly how you and your bookkeeper expect.
Need an account that is not in the starter set? Say your accountant wants shop supplies tracked separately. Click Add account in the top-right, then fill in three fields: a Name (for example, Shop supplies), a Type (here, Expense), and a Number that fits your numbering (for example, 6100). Click Save and it joins the list.
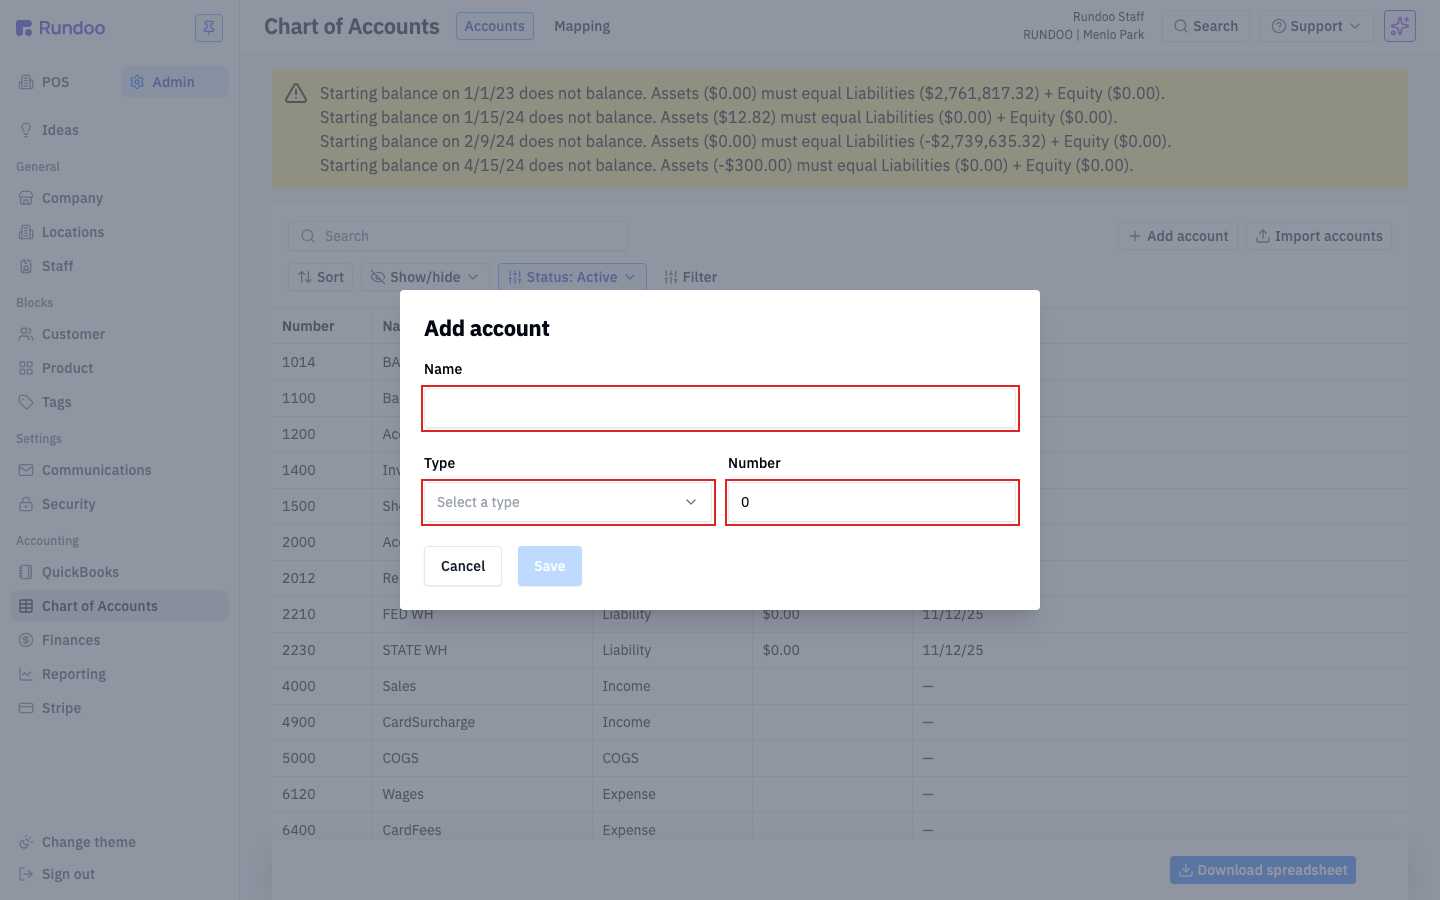
One thing to remember: adding an account creates the bucket, but it does not wire anything up. Nothing posts to it until you point a transaction at it on the Mapping tab. Your guide also helps bring your starting balances over from your old system, and Rundoo watches those for you: if a starting-balance date is out of balance, a banner appears at the top of the Accounts tab flagging that Assets do not equal Liabilities plus Equity, so you catch a mismatch early instead of chasing it later.
Now tell Rundoo where the money from each transaction should go. Click the Mapping tab. On the left you will see Rundoo's built-in transaction types, called control accounts (things like Cash drawer, Card deposits, and Sales). Your job is to point each one at the right General Ledger account, or "GL account," from your list. Every time you take a credit card payment, for instance, Rundoo needs to know which asset account that money posts to.
To check or change one, click its row to open Edit mapping. The Control account and Location at the top are read-only; they just tell you which row you are on. The one field you edit is the GL account dropdown. Open it, pick the account you want (type in the search box to filter), and click Save.
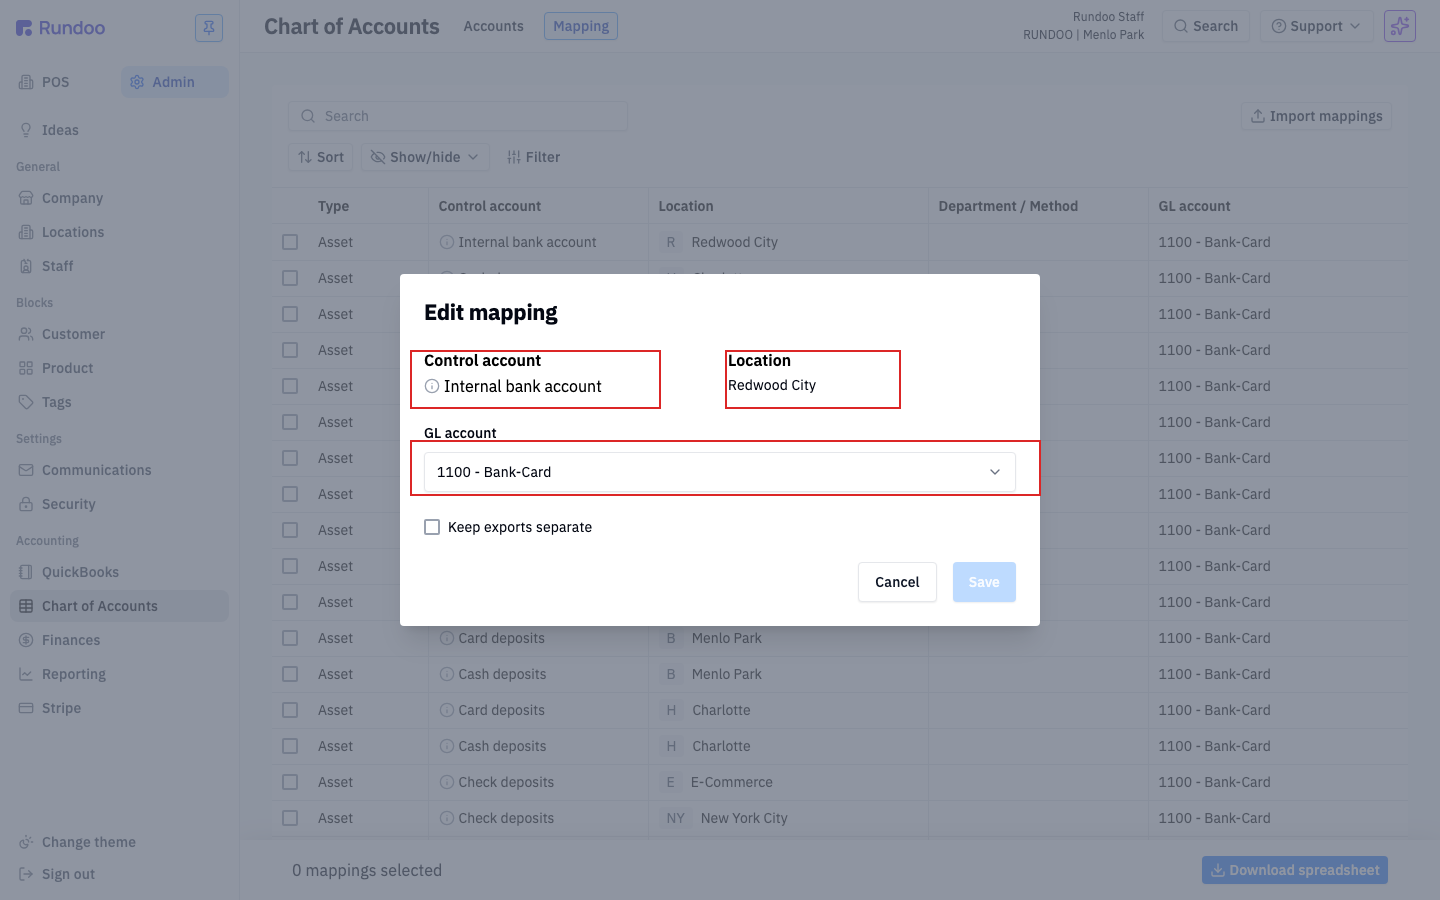
Because Rundoo pre-seeds sensible defaults, most stores rarely touch this. If your Chart of Accounts already mirrors your accountant's, the mapping is usually pointed where you want it.
The last piece is your cost method. Head back to Admin, open the Company tab, and scroll to the Cost management section. For most stores, leave this on Average cost, which is the default. It recomputes a weighted average unit cost each time you receive inventory, so a vendor's price swings get smoothed out over time instead of whipsawing your tracked cost. The other option, Standard cost, uses a fixed cost per product, and is only a fit if your accounting team has told you to use it.
To change it, open the dropdown, pick the other option, and click Save (or Cancel if you change your mind).
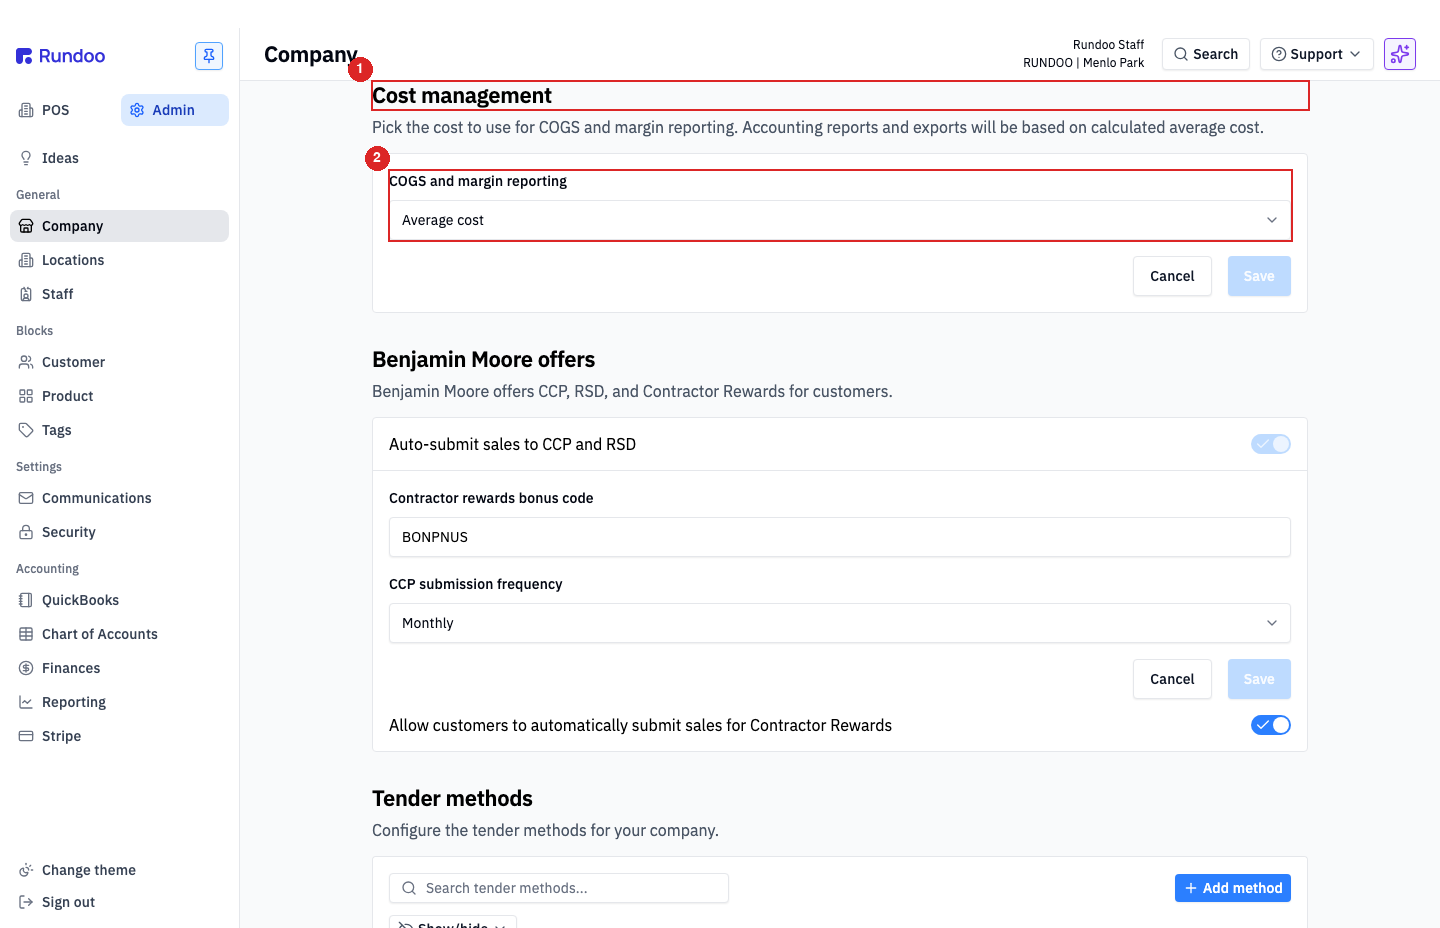
Chart of Accounts
Admin > Chart of Accounts > Accounts
Pre-seeded. Add accounts with Name, Type, Number.
Mapping
Admin > Chart of Accounts > Mapping
Points each control account at a GL account.
Cost method
Admin > Company > Cost management
Average cost (default) or Standard cost.
Account types
Asset, Liability, Equity, Income, COGS, Expense
Rundoo uses Income, not "Revenue."
Good to know