
Rundocs › Inventory
Products
Last updated 2026-09-18
Products are what you ring up, stock, price, and report on (every paint can, hardware SKU, and tintable base in your store is a Product record). This page covers adding a product, the detail page (history, inventory, pricing, costs, catalog, settings), duplicating, deactivating, and how alternate units of measure fit in.
In the POS mode, open Products in the left sidebar.
The Products list
The landing view is a filterable table of every active product at your current location. The search input in the top-left matches on name or any ID (Primary ID, additional IDs, barcodes). The Status: Active pill on the control strip limits the view to active products, change it to see deactivated records. Sort, Show/hide, and Filter are the usual list-page knobs; the column-header + buttons add per-column filters on the fly.
"I can scan RO179 and it pops up, but when I type RO179 it says product can't be found." Both the Products list and the search box on a sale match the same fields, whether you scan or type: name, Primary ID, additional IDs, and barcodes. So a code typed exactly right will find the product. The gotcha is that a scanner reads the exact characters stored on the product and a keyboard does not, so a typed code that is off by one look-alike character misses: the digit 0 typed as the letter O, 1 as a lowercase l, or 5 as S. When the characters don't line up, the search shows "No results found. Add a new product" instead of the product. Open the product's Settings tab to read its exact Primary ID and additional IDs, then re-type carefully. (If a scan itself is not matching, see Scanner troubleshooting.)
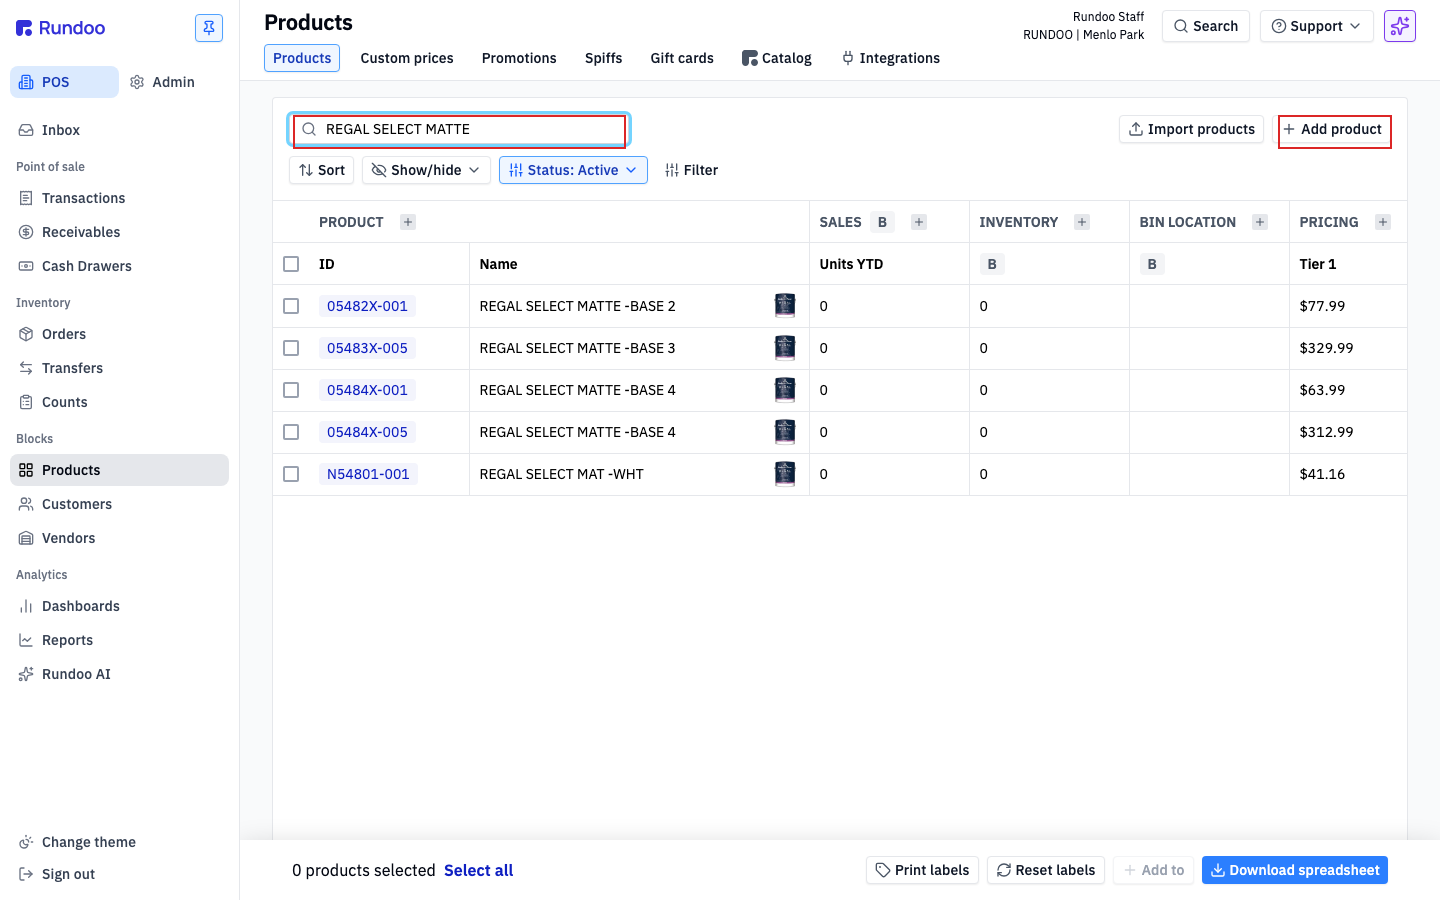
The two key actions top-right are Import products (bulk-create or update from a spreadsheet, covered in Product imports) and Add product for one-at-a-time creation. Clicking any row opens that product's detail page on the History tab.
Adding a product
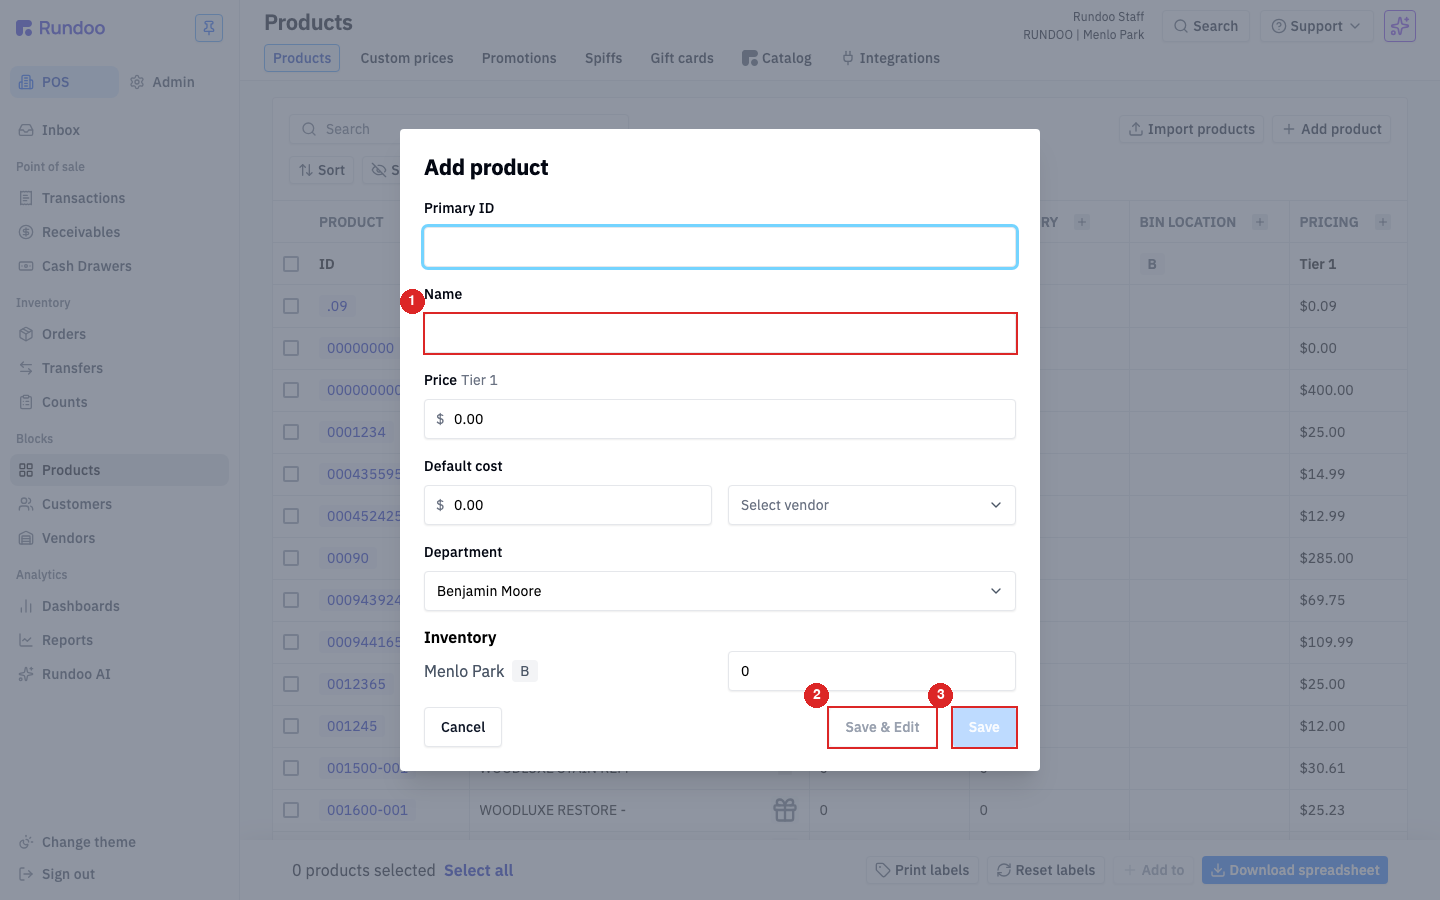
Click Add product in the top-right of the Products list. A modal opens with the fields required to create the record. Just the essentials. Everything else (class, fineline, alternate UOMs, custom prices, per-location inventory) lives on the product's detail page and gets set after creation.
| Field | What it does | Required? | Default |
|---|---|---|---|
Primary ID |
The product's canonical ID (what cashiers scan or type at POS). Must be unique across the company. | Yes | () |
Additional IDs |
Extra IDs that should also find this product at the counter (vendor codes, barcodes, alternate SKUs). Click Add to attach each one. | Optional | () |
Name |
The name that shows in search results, on receipts, and on labels. | Yes | () |
Price Tier 1 |
The price this product rings at for customers on the Tier 1 pricing tier. Other tiers inherit this as a starting point and can be overridden later on the Pricing tab. | Yes | $0.00 |
Default cost |
What you pay for it. Drives margin calculations and flows into inventory valuation. | Optional | $0.00 |
Department |
Top level of the taxonomy (Department > Class > Fineline). Reports, labels, and sales roll up here. |
Yes | Benjamin Moore |
Inventory |
Starting on-hand count at each of your locations. Zero is fine (you can bring stock in later with an order or a count). | Optional | 0 |
Between Name and Price, an Attach tag button lets you tag the product at create-time (pick existing tags or type a new one to create it). Tags can also be attached later from the product's detail-page header.
Three save buttons sit at the bottom:
-
Save & Edit creates the product and drops you on its Settings tab, where the rest of the fields live. Use this when you know you're about to set a Class, a Fineline, or alternate units of measure.
-
Save & New creates the product and immediately reopens the Add modal with a blank form. Use this when you're entering five or ten products by hand at the counter. Faster than closing and reopening Add product each time, and lighter-weight than firing up Product imports for a small handful.
-
Save creates the product and closes the modal. Good when the Add-modal fields are all you need.
Class and Fineline can't be set from the Add modal. The Add-product form only exposes Department (the top of the Department > Class > Fineline taxonomy). Class and Fineline both live on the Settings tab, under the Categorization section. They're fillable only after the product exists. Use Save & Edit to jump straight there.
Adding products one at a time is fine at the counter. If you're setting up a new vendor catalog or migrating from an old system, see Product imports (you can create hundreds of products in a single spreadsheet upload).
The product detail page
Clicking a row in the Products list opens that product's detail page on the History tab. The page header carries the product image, Primary ID, name, default vendor, and one of the additional IDs; an Attach tag link below the header adds a tag for reporting. The action cluster at the top-right holds the page-wide actions (Print label, View mobile label, Attach file, Duplicate, Deactivate).
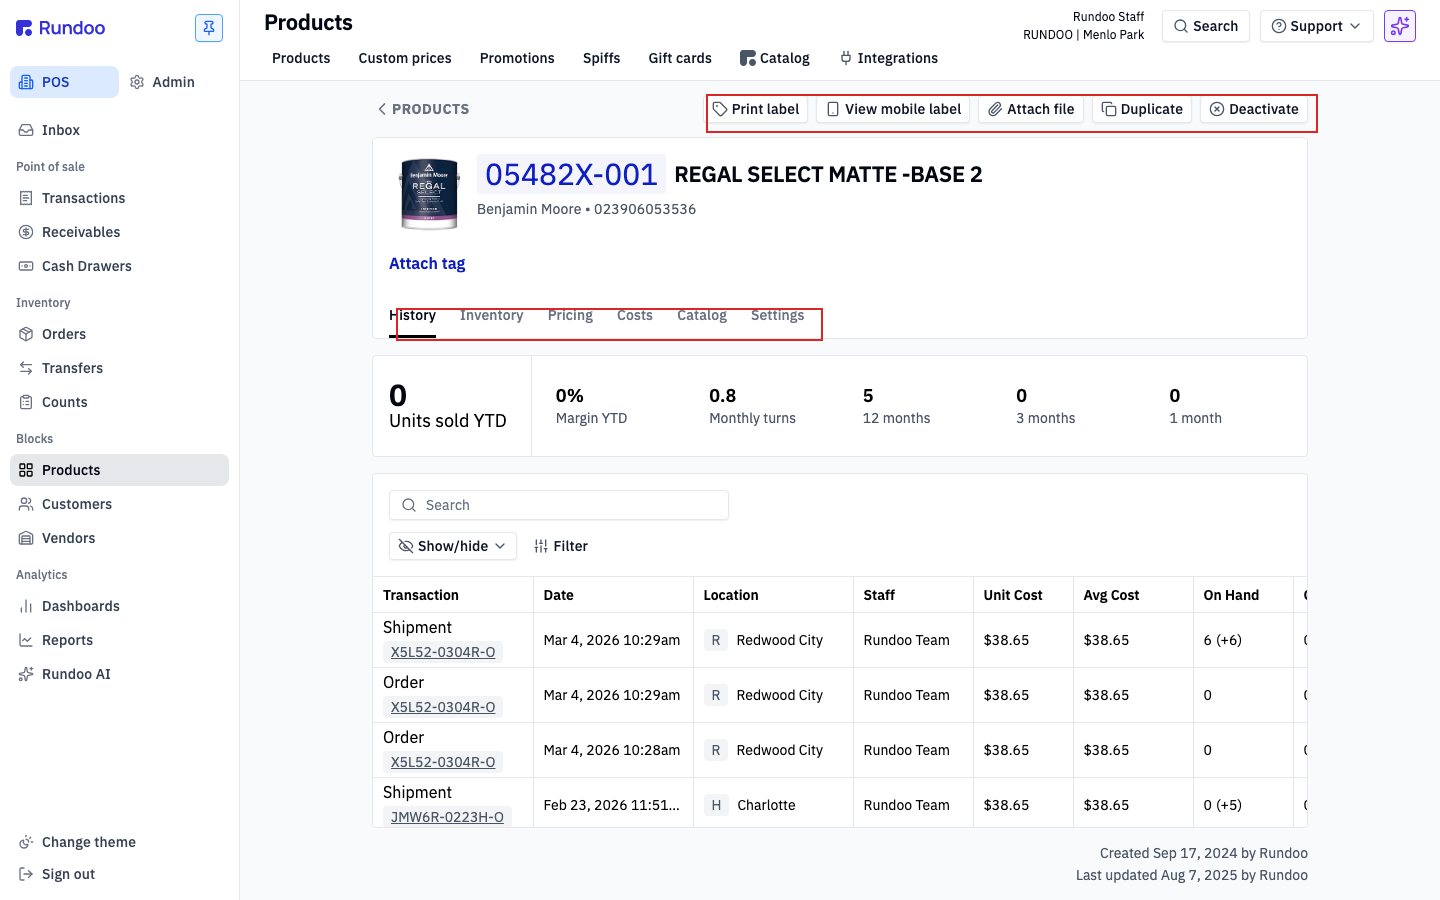
Under the header, six top tabs split the product's data:
-
History (the default view). Every movement of this product: sales, orders, transfers, counts, shipments, vouchers (one row per event), ordered by date. The row of summary tiles up top (
Units sold YTD,Margin YTD,Monthly turns,12 months,3 months,1 month) gives the shape of demand at a glance. -
Inventory, on-hand, on-order, committed, and per-location Min / Max thresholds. See Setting min/max reorder points below for the configuration walkthrough.
-
Pricing (every pricing tier's price for this product, plus any active promotions, customer-specific overrides, and quantity breaks for this SKU). Quantity breaks are threshold-based discounts (e.g. buy 4, take 10% off) added with
Add quantity breakon the Pricing tab. Each break carries a quantity threshold and a discount percent. Quantity breaks do not stack with each other or with custom prices: if a customer hits two thresholds on the same line, Rundoo applies the better of the two, not the sum. See Pricing tiers and Custom prices for how the tiers and overrides work. The Pricing tab is also where quantity breaks live (the Alternate pricing card on this tab is where you set price breaks at a quantity threshold (buy 12, get 5% off) or per-UOM pricing (different price for a 5-gallon pail vs. a single gallon)). Walk-through in Product prices. Quantity breaks don't stack (if you configure12 units → 5% offand60 units → 10% off, a cart of 60 units rings at 10% off, not 15%). -
Costs (default cost, average and standard cost, and a cost row per vendor). This is also where a product's vendor lives: each cost you record is tied to the vendor you pay it to, so adding a vendor to a product means adding a cost row here. See Setting a product's vendor below. Costs also flow in from purchase orders and counts.
-
Catalog, vendor-catalog metadata that powers search richness (long description, color family, product imagery).
-
Settings, every editable field on the product (see Editing a product below).
Setting a product's vendor
To add a vendor to an existing product (or change which vendor a SKU is bought from), go to the Costs tab, not Settings. There is no "Select vendor" field on the Settings tab or in the Product Information section. In Rundoo a vendor is attached to a product through its cost, because each cost you record is the price you pay a specific vendor, so the vendor lives on the Costs tab.
-
Open the product from Products (POS > Products, then click its row).
-
Click the Costs tab. The cost table lists a row per vendor with columns
Cost,Vendor,Unit cost,Unit of measure,Unit quantity, andDefault. -
Click Add new cost (top-right of the Costs section).
-
In the Add new cost modal, pick the Vendor, enter the Cost, set the Unit of measure, and turn on Use as default cost if this vendor should be the product's default.
-
Click Save.
A product can carry more than one vendor cost (a primary supplier and a backup, say). The row marked Default: Yes is the product's default vendor, which is the one shown in the product's header and the one purchase order suggestions draw from. To change or remove a vendor, click its row on the Costs tab to open Edit cost, where you can swap the vendor, change the cost, flip the default, or Delete the row.
To pair a whole vendor catalog to your products at once (so Rundoo knows each product's vendor SKU for a catalog integration like Benjamin Moore, Do It Best, True Value, or Orgill), use Assign vendor SKUs on the vendor's detail page instead of adding costs one at a time. See Vendors.
Cost vs Average cost vs Standard cost
The Costs tab shows three cost numbers, and it's easy to wonder which one to edit, especially when you want to update what an item actually costs you so your margins recalculate. They are not the same field, and only one of them drives margin-based pricing.
Cost(the per-vendor rows). Each row is the price you pay one vendor for this item, entered with Add new cost. A product can carry several (a primary supplier and a backup). These are the raw inputs, not the number margin is figured against. Editing a vendor's cost row changes what that PO costs and feeds the average, but it does not by itself move aby marginprice.Average cost/U. The running weighted average of what you've actually paid across your receipts, purchase orders, and counts. Rundoo maintains it for you as stock comes in; you don't normally type it.Standard cost/U. A fixed cost saved on the product record, and the oneby marginpricing tiers compute against. If you price a tier at 40% margin, Rundoo figures the price off Standard cost, not the average and not any single vendor row.
So which do you edit to update your margins? Edit Standard cost. Click Edit average and standard costs on the Costs tab, set the new Standard cost, and every tier priced by margin recomputes to hold its target margin. Changing a vendor's Cost row or letting the average drift does not re-price those tiers on its own.
If Standard cost is $0.00, margin pricing breaks. A by margin tier will show inf margin and won't compute a sensible price, because it's dividing against a zero cost. Set Standard cost before you rely on by margin. Whether your store tracks cost as a moving average or a fixed standard is set once in Cost method; the margin math in Product prices reads Standard cost either way.
Setting min/max reorder points
Min and Max are how Rundoo decides when to suggest reordering a product. They live on the Inventory tab of the product detail page. One row per location, since the right stocking level for a slow store and a busy one is rarely the same.
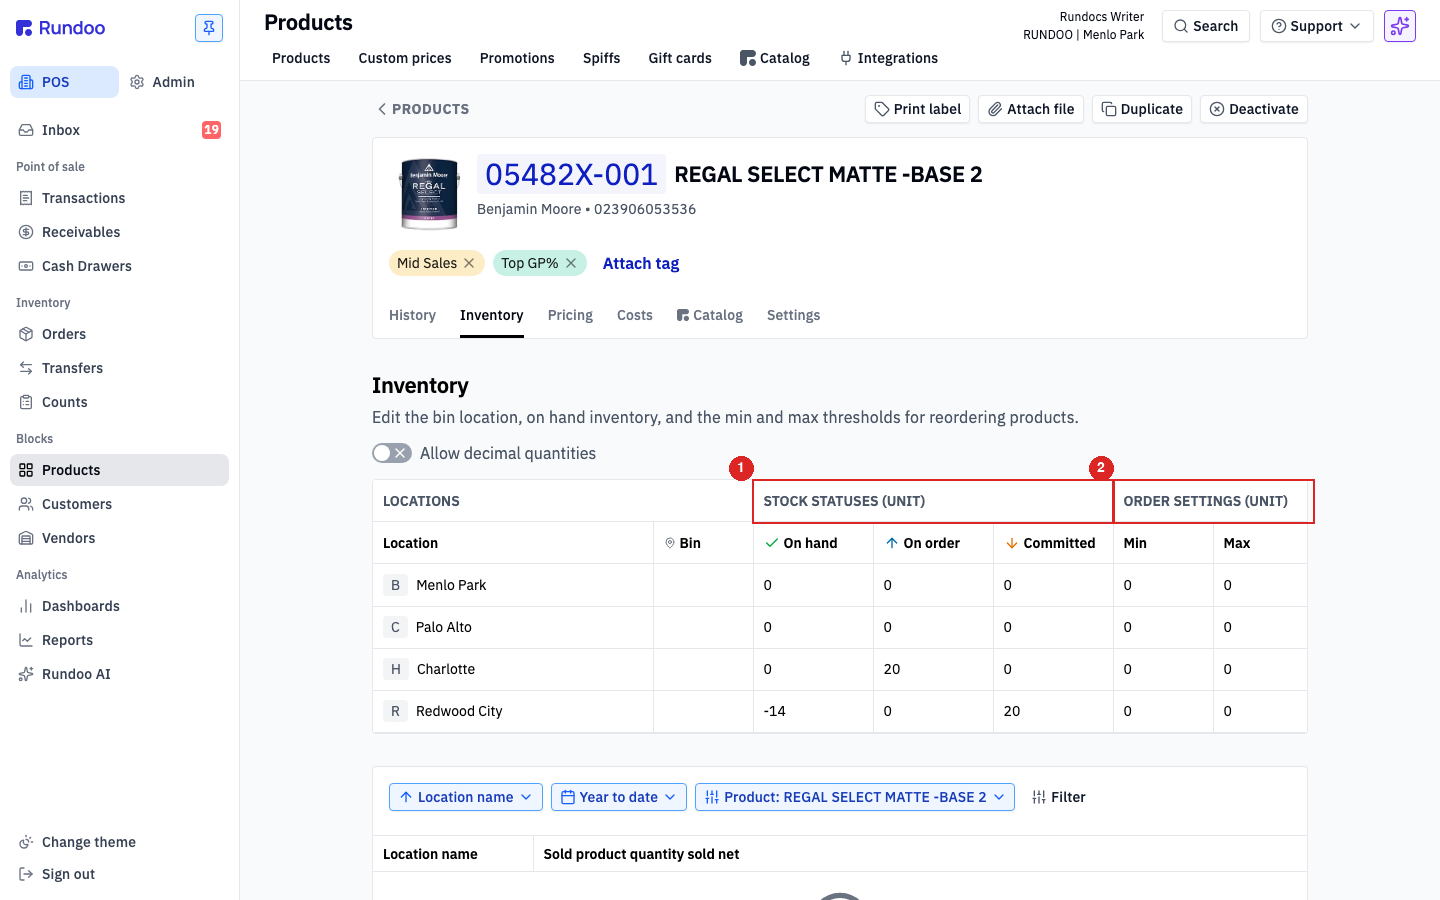
Each row carries seven fields:
-
Location(one row per location you operate). -
Bin, the shelf or aisle tag for this product at this location (free text; printed on shelf labels and pick lists). -
On hand(current physical count at this location). Adjusted by sales, orders, transfers, and Inventory counts. -
On order(units already on an open purchase order to this location) -
Committed, units allocated to open sales (drafts, quotes, will-calls). -
Min. The reorder trigger. WhenOn hand + On orderdrops below this number, the product is flagged for reorder when you clickGenerate orderon a PO. -
Max(the target stock level).Generate orderproposes enough units to bring the location back up toMax.
Click any row to open the Edit inventory modal (Bin location, On hand (Unit), Min (Unit), and Max (Unit)). Set the numbers and click Save; the row updates immediately.
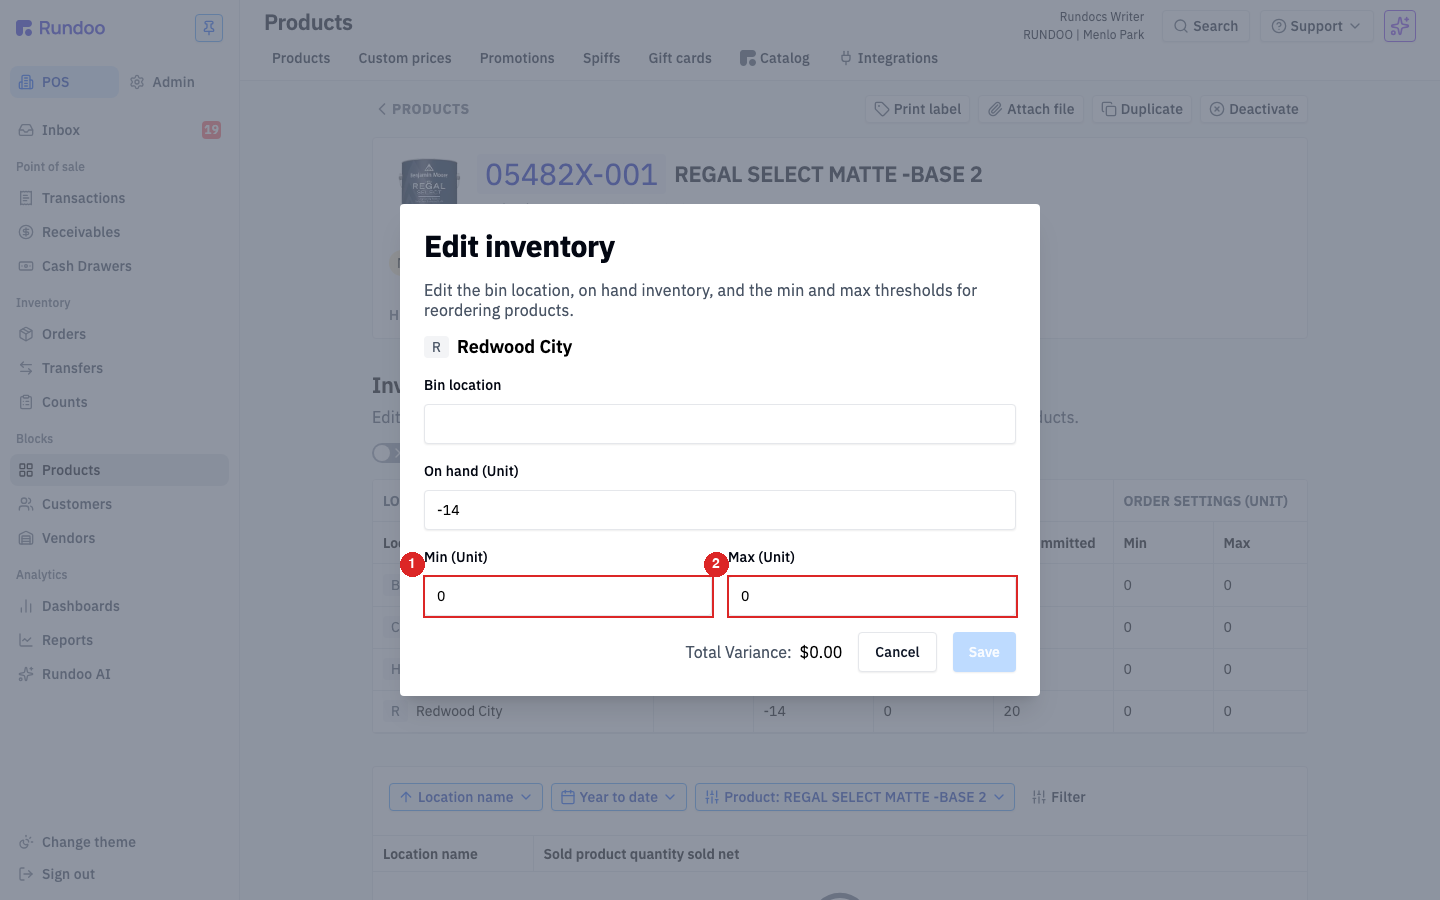
Min and Max are per-product, per-location. Setting Min = 12, Max = 24 on Redwood City doesn't touch Menlo Park's numbers. Set them on every location you stock the product at. Locations left at Min = 0, Max = 0 will never trigger a reorder suggestion.
No separate "target stock" field, Max is the target. Some legacy POS systems split "reorder point" and "target stock level" into separate values; Rundoo collapses them into Min (trigger) and Max (target). If your old system used three numbers (min / reorder / target), map them to Min and Max and discard the middle one.
How Generate order consumes these numbers (and the per-vendor choice between the Predictive and Min/Max algorithms) lives in Purchase orders. The "at min" vs "below min" trigger toggle lives in Product settings.
For bulk-setting Min/Max across hundreds of products, the Min and Max columns are exposed in the Products import template. See Product imports.
Editing a product
The Settings tab is where the product's fields live, grouped into sections. Each section has its own Cancel and Save. Saving one doesn't commit changes in another.
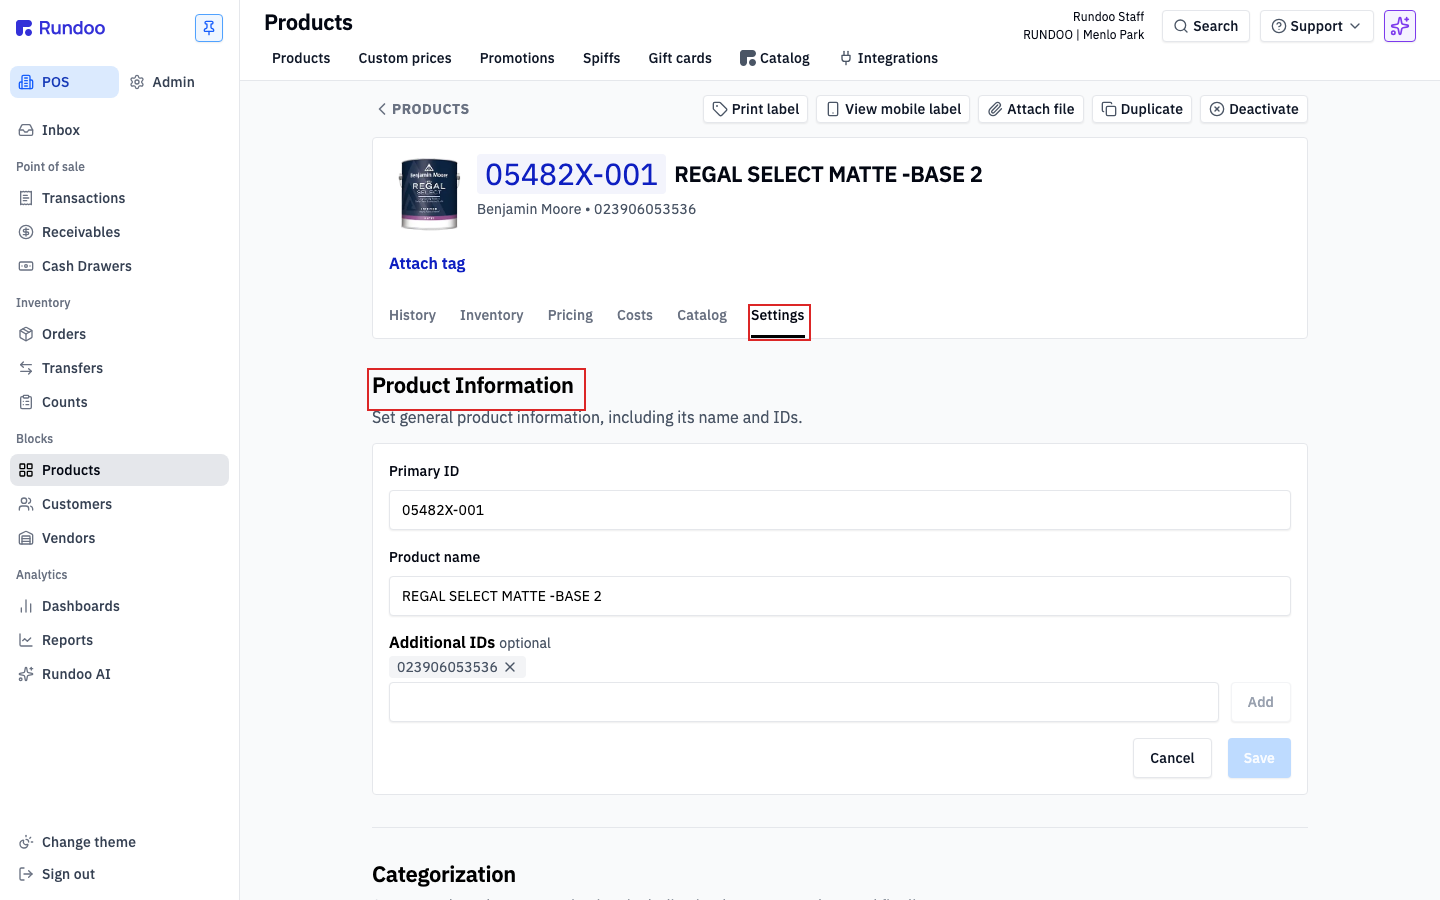
The sections, in order on the page:
- Product Information.
Primary ID,Product name, and anyAdditional IDs(vendor codes, barcodes, alternate SKUs that should also find this product at the counter). Also where Tags attach to the product (search/report tags created atAdmin > Product, surfaced as filterable chips on the Products list and in custom reports).
2-D barcodes (QR, Data Matrix) work the same as any code, even with no numbers to type. Additional IDs stores whatever your scanner reads, so a 2-D barcode is attached exactly like a UPC: click Add under Additional IDs, click into the empty field, and scan the code (don't type it). The exact characters populate the field; click Save. After that, scanning that 2-D code at the register pulls up the product like any other barcode. Most 2-D barcodes also print the UPC in human-readable text nearby, so if that number is there you can type or scan it instead.
-
Categorization (
Department,Class, andFineline). The full taxonomy lives here, and this is the only place Class and Fineline can be set (they aren't on the Add modal). See Units of measure for how UOMs interact with taxonomy. -
Additional charges, per-product surcharges (e.g. core charges, bottle deposits, environmental fees) that add to the line at POS.
-
Checkout (flags controlling how the product behaves at the counter). The main one for paint stores is
Tintable. Flip it on for any base that needs a color picked at the register (Regal Select, Aura, ben, etc.), and every time a cashier rings that product, Rundoo opens the Add line item modal with the tint picker so they can search a Benjamin Moore code before the line drops into the cart. See Sales for the cashier-side walkthrough of the tint modal. The other flags in this section areSpecial orderable(allows cost edits after the sale),Non stock(a product you don't keep on the shelf),Non-nesting line item,Disable for e-commerce, andPhysical gift card.
There's no "non-discountable" flag on a product. Rundoo has no per-product switch that marks one item as never-discountable across the board. To keep a product off a sale, you scope the promotion to only the items you do want discounted, rather than discounting everything and carving a few out. See Excluding items from a discount.
-
Notes, a free-text area for staff-visible notes about the product (application instructions, vendor-specific quirks).
-
Units of measure. Alternate UOMs (gallons, quarts, pints for paint; boxes vs. each for hardware) so the same product can ring in different pack sizes without creating separate SKUs. Also where Case Quantity lives (the minimum order multiple). If your vendor only ships in cases of 4 but you sell singles, set Case Quantity to
4and Rundoo rounds purchase-order quantities up to the nearest case while still letting cashiers ring single units at POS. Covered end-to-end in Units of measure.
Tintable products
For paint stores, the Tintable flag is the most important product-level setting. It's how Rundoo knows to prompt the cashier for a color when the product hits the cart. Flip it on for every base SKU that gets tinted at the counter (Regal Select, Aura, ben, etc.). Don't flip it on for ready-mixed cans, primers, or non-paint hardware.
Turning Tintable on
-
Open the product on the Products list (POS > Products).
-
Click the Settings tab.
-
Scroll to the Checkout section.
-
Toggle Tintable on.
-
Click Save for that section.
The next time the product is rung into a sale, the Add line item modal opens with the tint picker before the line drops into the cart.
What happens at the counter
With Tintable on, a cashier scanning or searching the product gets the Add line item modal instead of a direct line add. The modal includes:
-
Tint toggle: Search vs Custom.
Searchlooks up Benjamin Moore codes (or whatever color library is configured);Customlets the cashier type a free-text color ("customer match: 1995 Honda Accord rust"). -
Receipt note. Prints on the customer's receipt. Use this for the color name or the formula reference.
-
Internal note (doesn't print on the receipt). Use this for tinting machine notes ("tint in-house, can chipped at the bottom").
Click Add to drop the tinted line into the cart. The line carries the tint information through the sale, the receipt, and into history. A re-tint a year later can pull the original formula from the past sale.
Sending tinted products from COLORx to a new sale
If you use COLORx for color-matching, you can push a tinted formula directly into a sale on Rundoo:
-
In COLORx, tint and dispense the formula as usual.
-
Open Rundoo to the New sale screen.
-
Below the Search and add product box, a
X tinted productsbutton appears showing the count of formulas waiting to be sent over from COLORx. Click it. -
Pick the matching tinted product and click Add to sale. The line drops in with the color and formula already attached.
This path keeps the formula from being re-typed at the counter and avoids transcription mistakes. See COLORx for the COLORx-side setup.
Don't see your tint catalog? If the Search toggle isn't matching Benjamin Moore (or your configured) color codes, message Rundoo Support. The catalog is configured per tenant and may not be enabled on yours yet.
Sale notes and reminders
Sale notes are popups that take over the screen during a sale to make sure a particular detail isn't missed ("Ask for the customer's PO number," "Mention the new Color of the Year," "Confirm they want the 5-gal pail"). Unlike static notes that get ignored, sale notes block the sale until the cashier clicks Confirm, hits Esc, or clicks outside the modal.
Where to set them
Notes live in two places, depending on whether they should fire on the customer or the product:
-
Per-customer: open the customer, go to Settings > Notes > Sale reminders.
-
Per-product: open the product, go to Settings > Notes > Sale reminders.
Type the reminder text and save. The next sale that includes that customer or product will trigger the popup.
How they look at checkout
When a customer with a sale note is added to a sale, the popup appears immediately. The cashier reads it and dismisses with Confirm, Esc, or a click outside. After dismissal, the note stays visible as a persistent banner on the checkout screen, a second reminder while the cashier is finalizing the cart. The same flow applies when a product with a sale note hits the cart.
Reserve sale notes for protocol-critical reminders. Anything that interrupts the cashier mid-sale should be worth interrupting them for (PO collection, rebate paperwork, return-policy reminders, color-of-the-year mention). Static info that doesn't need to block the sale belongs in the regular notes field, not Sale reminders.
Single-use taxation
Some contractor customers pay tax only on goods they can re-use (a sprayer, brushes, ladders) but not on goods that get consumed on a job (paint, primer, caulk). This is common for contractors whose end customers are tax-exempt (government buildings, churches, schools) because the consumed materials become part of an exempt project, while the tools the contractor keeps remain taxable.
Rundoo handles this with a single-use tax designation that combines a product flag and a customer flag. Both have to be on for tax to be skipped on a given line.
Step 1: Mark single-use taxable products
On each product that should be tax-exempt for single-use customers (paint, primer, consumables), open the product, go to the Settings tab, and turn on the Single-use taxable flag. Save.
Leave the flag off for products that contractors keep and re-use (sprayers, brushes, hardware, equipment). Those stay taxable.
Step 2: Mark single-use taxable customers
On each customer who qualifies, open the customer, go to their Settings tab, and fill in the Single-use tax exemption number. Ideally this is their state-issued single-use tax certificate number, but Rundoo accepts any non-empty value as the marker that this customer is single-use exempt. Save.
Step 3: Ring a sale
When the cashier attaches the single-use-exempt customer to a cart and adds a single-use taxable product, that line rings with no sales tax. Lines for products not marked single-use taxable (the sprayer, the brushes) still ring with full tax. Both kinds of lines can sit on the same sale, Rundoo evaluates the flags per line.
Both flags are required. A single-use exempt customer buying a product that isn't single-use taxable will be charged tax. A tax-paying customer buying a single-use taxable product will be charged tax. The exemption only applies when the customer flag and the product flag both line up. See Tax for full-customer tax exemption (different from single-use).
Duplicating a product
Click Duplicate in the action cluster at the top-right of a product's detail page. Rundoo creates a copy with every field carried over (name, price, cost, vendor, department, class, fineline, UOMs) and drops you on the new record's Settings tab so you can tweak what makes this one different. Good for adding a new color of an existing paint, a new size of an existing SKU, or a seasonal variant of a staple.
Duplicate appends _1 to the Primary ID without collision-checking. A duplicate of 05482X-001 becomes 05482X-001_1. If 05482X-001_1 already exists (because you duplicated once before), save will fail on the uniqueness check, change the Primary ID on the new record first. Duplicate doesn't look before it leaps.
Product images and UPCs
Product images show up everywhere a line appears, at POS, on orders, on transfers, on the mobile POS app, and on the customer app. A product gets its picture one of two ways: you upload your own, or Rundoo pulls one automatically from a master catalog matched on the product's UPC.
Uploading your own picture
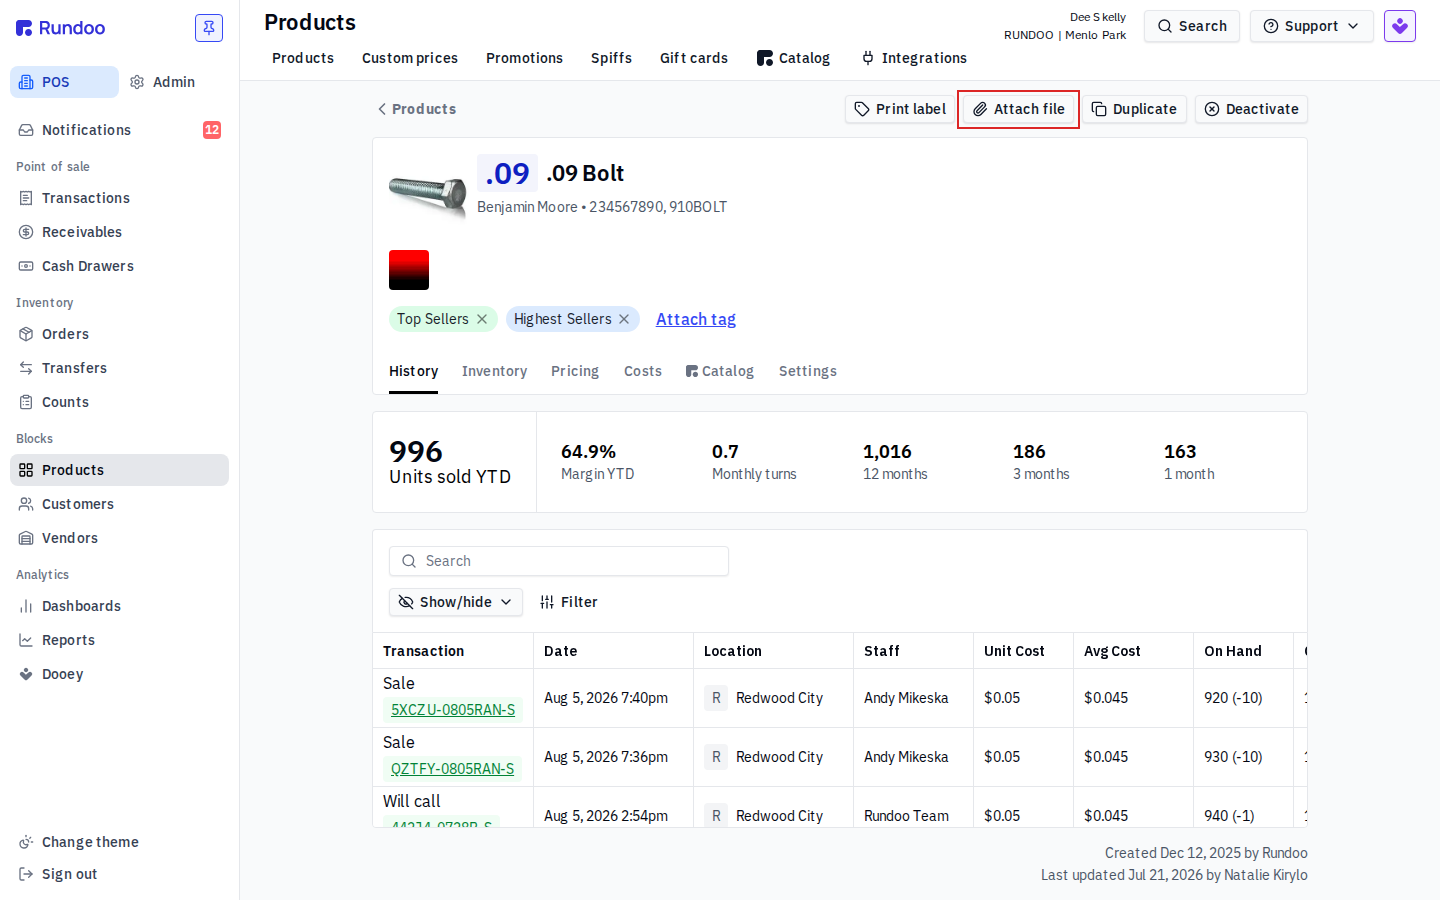
Open the product and click Attach file in the action cluster at the top-right of the detail page, then pick an image (PNG, JPG, or HEIC). You can also drag an image file from your computer straight onto the product page and drop it. The image you attach becomes that product's picture and shows everywhere the product appears, taking the place of any automatic catalog image.
Automatic catalog images
If you haven't attached your own picture, Rundoo matches the product to a master product database on its UPC (the 12-digit barcode) and pulls the image from there. Two reasons a product might show no image this way:
-
No UPC on the product. Add a UPC on the product's Settings tab under Additional IDs and the image usually appears after the next catalog refresh. (Or just attach your own picture, above.)
-
UPC exists, but no image in the master database yet. Rundoo is continuously enriching image coverage, especially for high-volume SKUs. Attach your own picture, or message Rundoo Support if an image is missing on a product you sell frequently.
The automatic match can also pull the wrong picture (the master catalog has an incorrect image on that UPC). Attaching your own picture, as above, overrides it on your store right away. To get the shared catalog image itself fixed so it's right everywhere, message Support.
See an incorrect image in the Rundoo catalog? Message Rundoo Support and tell us which product's picture looks wrong. We'll get the catalog image updated. Attaching your own picture fixes it on your store immediately while we correct the shared catalog.
If you have a lot of products without UPCs (common when migrating from a legacy system that only tracked SKUs), message Rundoo Support and ask about the UPC enrichment tool. It looks for high-confidence matches against the master database (e.g. a product with vendor identifier N5471X01 sold as Benjamin Moore maps to UPC 023906760779) and adds UPCs in bulk. Getting UPCs on is worth it beyond images: every UPC is also a scannable barcode for Inventory counts and for fast POS scanning.
Deactivating a product
Click Deactivate in the action cluster at the top-right of a product's detail page to retire it. Deactivation is a soft archive. The product keeps its history (past sales, orders, counts, and transfers all still reference it), but it stops appearing in product search at POS or in the default Products list. Useful for discontinued SKUs, vendor-specific products when you change suppliers, or seasonal items you'll bring back later.
Deactivated products stay in history but don't appear in search. They don't show in POS search results, don't appear when a cashier scans a barcode, and don't surface in the default Products list. They're still there for reporting and for any existing transaction that referenced them. To bring one back, change the Status filter on the Products list to see deactivated records, open the product, and click Reactivate where Deactivate used to be.
Merging duplicate products
Two records for the same item (a staffer adds a product that already exists, just under a different UPC or code) is common, especially right after a migration from an old system. Rundoo doesn't have a self-serve Merge button today: there's no action in the product's top-right cluster (Print label, View mobile label, Attach file, Duplicate, Deactivate) that folds two products into one. Rolling two records' full sales and purchasing history together under a single SKU is a frequently requested feature Rundoo is tracking, but it isn't available yet.
Rundoo can't merge two product records into one, so their past sales and purchasing history stay separate even after you consolidate onto a keeper. Want this? Vote for it on the Idea board at rundoo.nolt.io/621.
What you can do today is consolidate onto one keeper product so your go-forward catalog is clean:
-
Pick the keeper. Decide which of the two records you'll keep ringing on going forward.
-
Move the other product's IDs onto the keeper. Open the keeper, go to the Settings tab, Product Information section, and add the duplicate's UPC, vendor code, or alternate SKU under
Additional IDs. Now a scan or a typed search of either code lands on the keeper at the counter. -
Move the on-hand over. The duplicate's stock doesn't follow its IDs, so bring it onto the keeper with an Inventory count or adjustment, then zero out the duplicate.
-
Deactivate the duplicate. Open it and click Deactivate in the action cluster. It drops out of POS search and the default Products list but keeps its own past history for reporting (see Deactivating a product above).
This cleans up the catalog, it does not combine history. The keeper and the deactivated duplicate each keep their own separate sales and purchasing history; this path gives you one clean product to ring going forward, but it does not roll the two records' past numbers into one. There's no tool that merges product history today. If you have a large batch to consolidate, or you need the two histories combined for reporting, message Rundoo Support so they can flag it for you.
Recommended Rundocs
-
Units of measure, alternate UOMs (gallons, quarts, pints) on the same SKU.
-
Pricing tiers, how the
Tier 1price set on Add maps to the prices other customer tiers see. -
Product imports, bulk-creating or updating products from a spreadsheet.
-
Product prices (managing per-tier pricing on the product's Pricing tab).