
Rundocs › POS
Special orders
Last updated 2026-09-11
A special order is how you order a product from a vendor for a specific customer when it's not in stock. Rundoo ties the customer to a purchase order, tracks it through ordered → received, and rings it up when the customer comes to pick it up. The coupling between a customer's sale and the vendor PO is what Rundoo calls Linked Sales and Orders (one line on the counter side, one line on the buyer side, kept in sync as the PO moves from ordered to received). Deposits for Special Orders is the optional front-end: a percent of the total captured up front when the customer commits, so you aren't floating the cost until pickup.
In the POS > Transactions > Special orders tab, every special order lives once it's created. The buyer's cross-customer view (every outstanding special-order line across all open POs) lives in POS > Orders > Buyers list.
If it looks like Rundoo won't let you save, will-call, or draft a sale because the product is set to 0 in stock (or you're selling more than you have on hand for something you're about to special-order), that isn't a block. It's a one-click confirmation you click past, see Step 4 below. It isn't a setting you switch off; it's an acknowledgement you confirm on each sale.
Special order vs. will-call
These two get mixed up at the counter constantly, so it's worth a minute.
-
A special order is for a product you don't have. The line gets onto a vendor PO, tracks through the PO lifecycle, and rings up when it lands.
-
A will-call is for a product you do have. You pull it off the shelf, set it aside, and hold it for the customer until they're ready.
If the product's on the shelf, it's a will-call. See Drafts, quotes & will-calls. If you have to order it from a vendor first, you're in the right place.
Step 0: Set up a Sale form (one-time, per product class)
A Sale form is a small per-product questionnaire that opens at cart time, the place a cashier captures the door swing, jamb size, glass tempering, blind dimensions, or whatever the vendor needs to actually fulfill the order. You configure forms once in Admin, then attach the right form to each special-orderable product so the cart-time modal asks the right questions.
Build the form. In the Admin mode, Product left tab, scroll to the Sale forms section. Click + New to open the New sale form modal. Set:
-
Form name, what cashiers will see in the picker (e.g.Doors,Custom blinds,Glass). -
Field namerows, one per data point you want captured. Click + Add field for each. -
Field typeper row,Text fieldfor short answers (Width,Color) orParagraphfor free-form notes.
A Notes field is included by default on every form (you don't add it manually). Click Save to commit.
Attach the form to a product. In POS > Products, pick the product, open the Settings top tab, and find the Checkout card. The Sale form dropdown lists every form configured in Admin; pick the right one for this product. The card's helper text, "Tintable products will show a modal to add tint. Special orderable products will allow cost edits after sale.", is a reminder that the modal that opens at cart time depends on the toggles below.
Step 1: Mark the product as Special orderable
A special order starts with a flag on the product itself. In the POS > Products tab, pick the product, open the Settings top tab, and scroll to the Checkout section. Flip the Special orderable toggle on.
The toggle is gated on inventory. Special orderable can only be flipped when the product has 0 On Hand and 0 Committed inventory. If either is non-zero, the toggle is disabled, zero out the inventory or wait for it to clear before changing.
Without this flag, saving an out-of-stock line as a draft, quote, or will-call just saves the document. It does not route the line into the special-order workflow, and the buyer won't see it on the Buyers list tab. Turn it on once per product you'd be willing to order in for a customer; it stays on until you turn it off.
Rundoo doesn't offer a simple 'backorder' status for regular out-of-stock items on customer transactions, if your store wants to commit a sale without creating a dedicated special order. Want this? Vote for it on the Idea board at rundoo.nolt.io/753.
Step 2: Open the Special orders tab
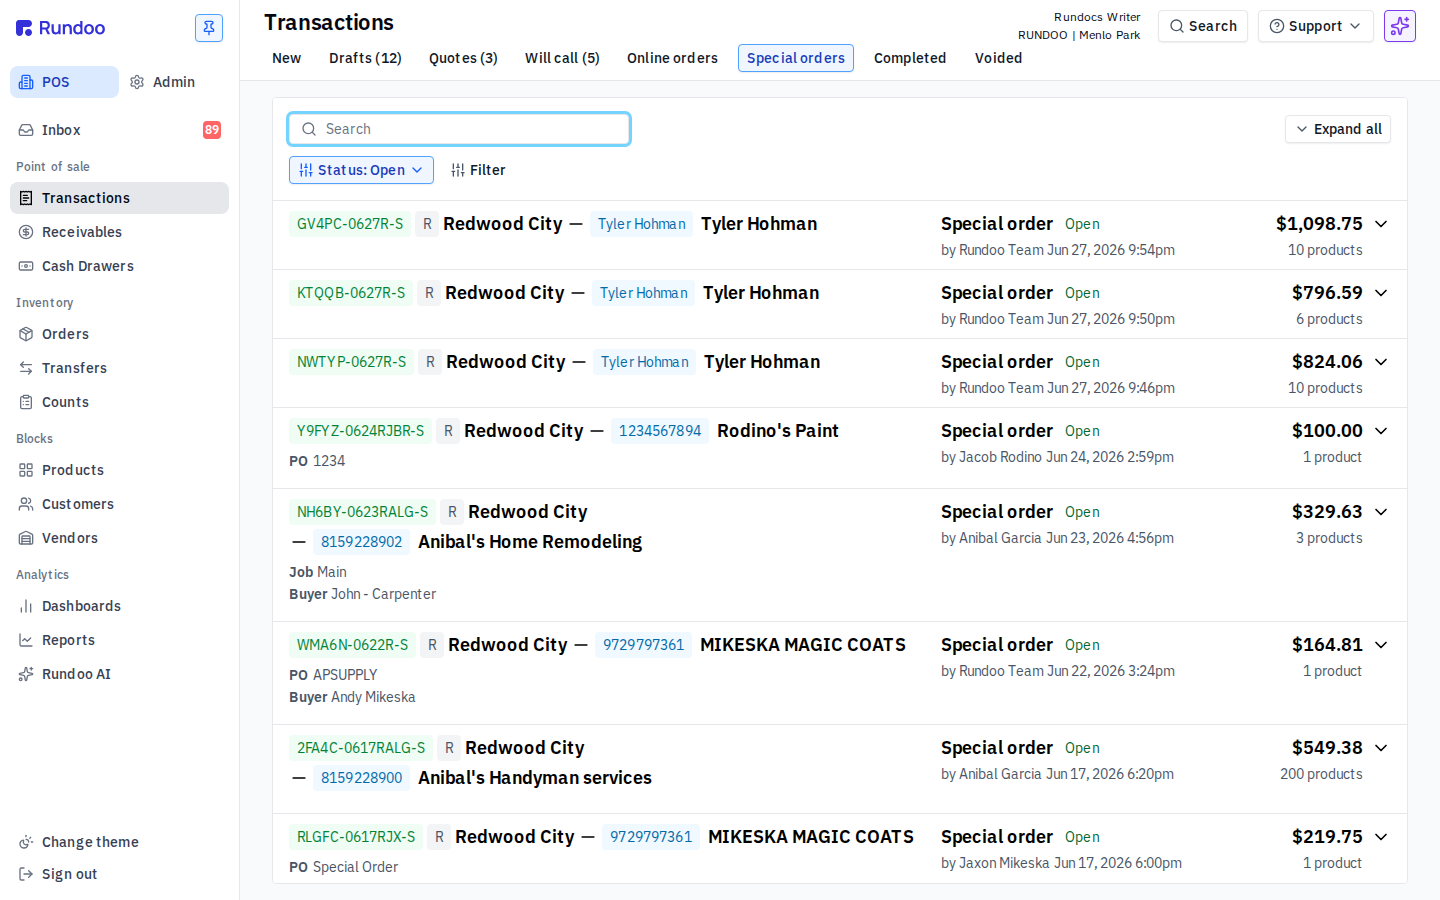
In the POS mode, open Transactions and switch to the Special orders top tab. Every open special order for the current location is listed here (customer name, vendor-side order IDs, status, and total) with a location picker and a filter strip at the top.
If the tab is empty, either your store has no open special orders right now, or the Location: filter is narrower than you want. The Location: control above the table lets you switch stores or pick All locations.
Step 3: Start a sale with the Special orderable product
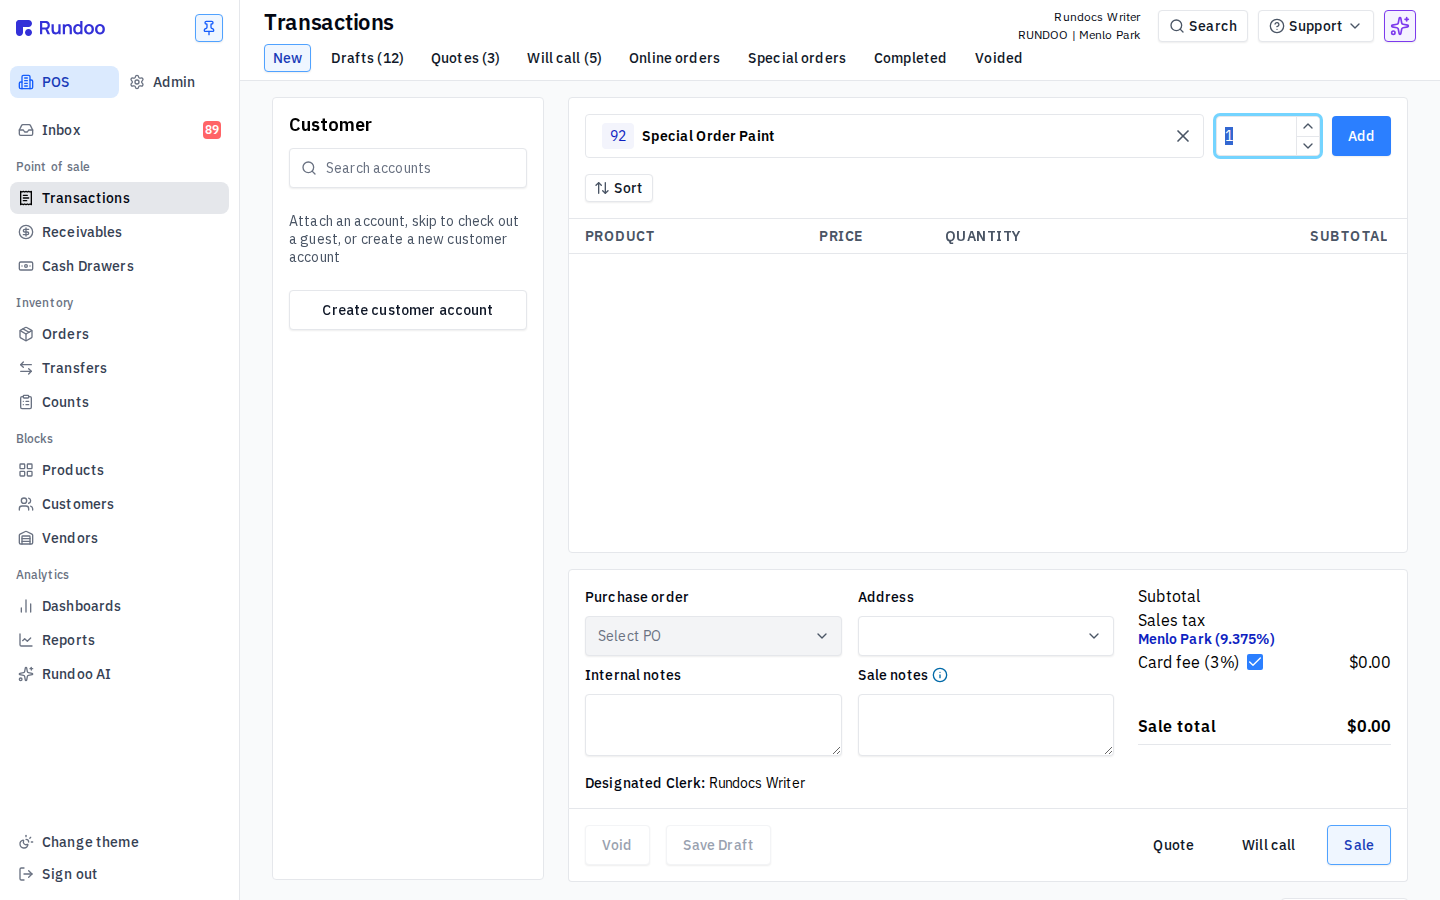
With the product flagged (see Step 1), open Transactions > New, attach the customer, and search for the product. Because it's Special orderable, the Add line item modal that opens has a Special order heading band across the top, a visual signal that this isn't a regular line. Walk the modal top to bottom:
-
Price segmented control (
By dollar,By margin, orBy discount). Pick how you want to set the line price relative to the reference. -
Reference price (Tier 1), Price, Gross margin, Discount. A read-out row that shows what the price resolves to under each lens, recomputing live as you type.
-
Retail price. The price you want to print on the customer's copy. Stays on the receipt as the published price.
-
Cost, your cost from the vendor. Cashier-editable on special orders (the Settings card's helper "Special orderable products will allow cost edits after sale" is what unlocks this), so you can correct it once the vendor confirms.
-
Sale form section. The fields you configured in Step 0 render here, driven by whichever form you attached to this product. Capture what the vendor needs to fulfill (door swing, dimensions, color spec).
-
Notes. Split into
Receipt(prints on the customer's copy) andInternal(stays on the line for staff).
Click Add to commit the line into the cart.
No Deposit field in this modal. The deposit is taken later from the saved special order's detail view (see Deposits for Special Orders below). The modal's job is just to capture pricing, cost, and the sale-form data, the deposit tender selection and amount happen on a separate panel after save.
💡 Attach the customer first. A special order with no customer attached has no one to notify when it arrives, and no one to pick it up.
Multiple special-order products in one transaction split into separate sales. If a customer wants three different special-order items, Rundoo creates a separate sale per item (each gets its own row under the Special orders top tab) so each can move independently through the PO lifecycle. Vendor lead times, partial receives, and deposits all behave per-item. Consolidate the customer's payment by attaching a charge account, each special-order sale lands as a separate invoice on their balance, then they pay the whole stack down via Bill payments.
Regular in-stock products are the exception to that split. You can add a plain stock item (one that isn't marked special orderable) into a special-order sale alongside the special-orderable line, and it stays in the same sale rather than spinning off its own. Any deposit you take on that sale then covers the stock item too, so you can collect money down on stock and special-order product together in one transaction.
Step 4: Save the sale, and confirm the negative-inventory prompt
With a Special orderable out-of-stock line in the cart, open Transactions > New, attach the customer, add the product, then click Save Draft, Quote, or Will call (whichever matches how the customer's committing). Rundoo pops a Confirm transaction details dialog: "There are some products in your cart that have insufficient inventory. Inventory will go negative for these products on completion of this sale." Click Confirm to save and flag the line for ordering.
"It won't let me save," "it stops me from will-calling a 0-qty item," "how do I turn off the warning?" That is this same Confirm transaction details prompt, not a hard stop. Selling or will-calling a product that's set to 0 (or any quantity below what's on hand, which is normal for something you're special-ordering) makes Rundoo ask you to acknowledge that inventory will go negative before it saves. Click Confirm and the Save Draft, Quote, or Will call goes through. It isn't a toggle you switch off; it's a per-sale acknowledgement you click past each time.
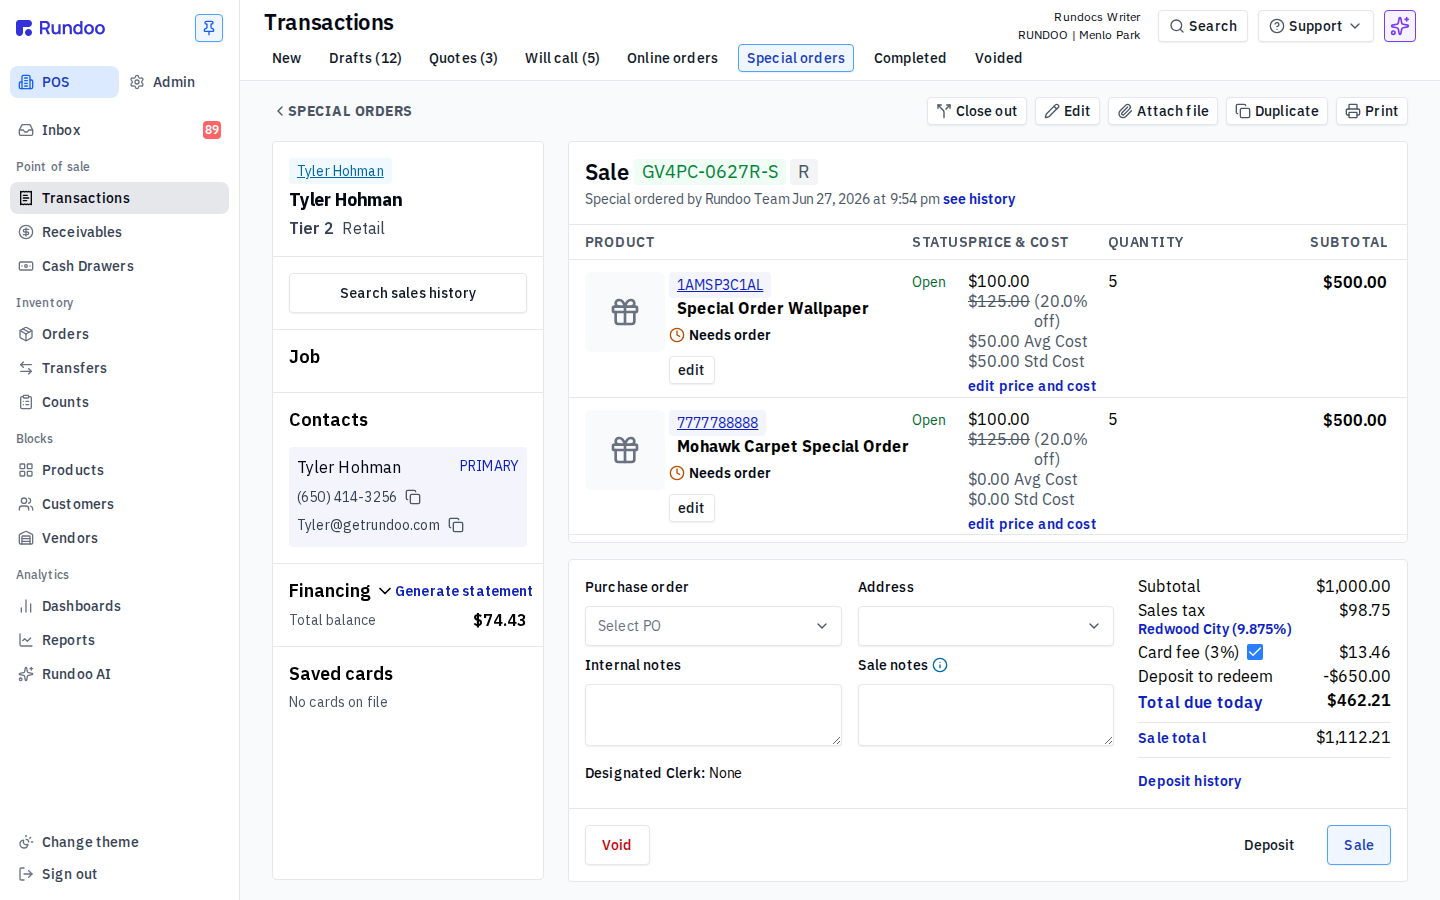
The saved order appears under the Special orders top tab. The detail view shows the customer on the left, the line with its Special Order status in the center, and the totals on the right.
Step 5: Your buyer runs the PO from the Orders side
Once the special-order line exists, your buyer takes over. In the POS > Orders tab, the Buyers list top tab is the cross-customer, cross-PO view of every outstanding special-order line. Filter by Default vendor or Linked order IDs, then Create new order (creates a PO for the selection) or Add to existing order (tacks onto a PO already in draft).
This is where Linked Sales and Orders earns its name: each outstanding line here is linked back to the customer's sale on the counter side, so when the PO moves to Received, the matching special-order line's state updates in lockstep. There's no automatic customer notification, once the row shows Received, it's on you to reach out.
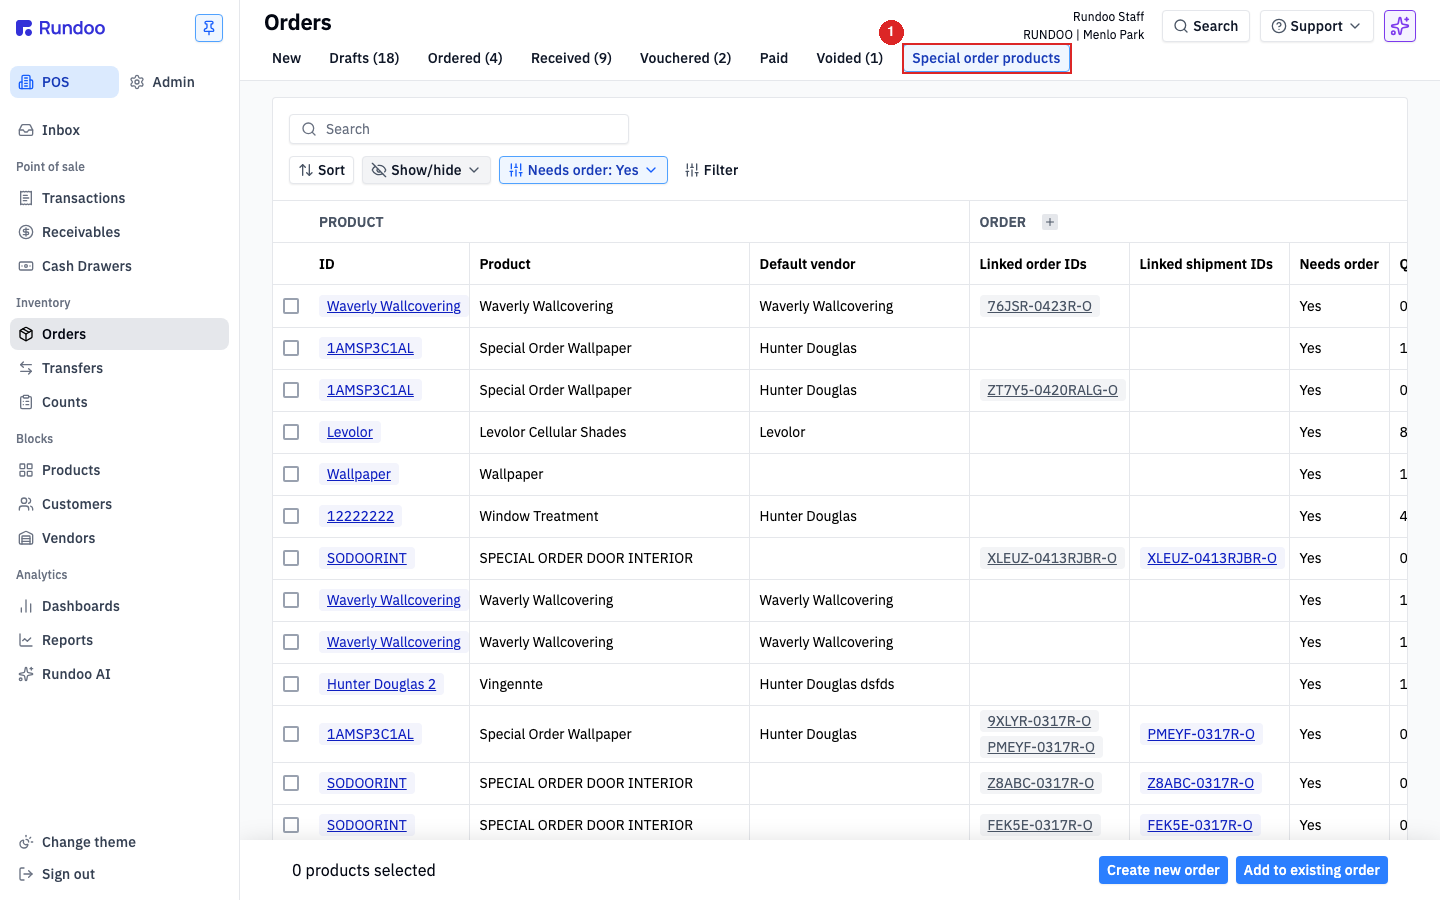
See Purchase orders for the full PO lifecycle (receiving, vouchering, paying the vendor).
📦 Partial receives. If the vendor ships 3 of 5, Rundoo marks only the 3 received. The other 2 stay on the PO, and the customer still waits for the rest. Give them a heads-up before they drive in.
Drop-shipping (vendor ships direct to customer). When the vendor's shipping straight to the customer's address instead of your store (a custom door, a pallet of bulk product, anything that doesn't pass through your shelves) set the PO's Ship-to to the customer's address rather than your location. Receiving still happens against the PO when the vendor confirms ship-out, but the goods never touch your inventory. Most other PO mechanics are unchanged.
Step 6: Track status and reach out when it arrives
Two places to watch, depending on who's asking.
-
The customer side. Stay in
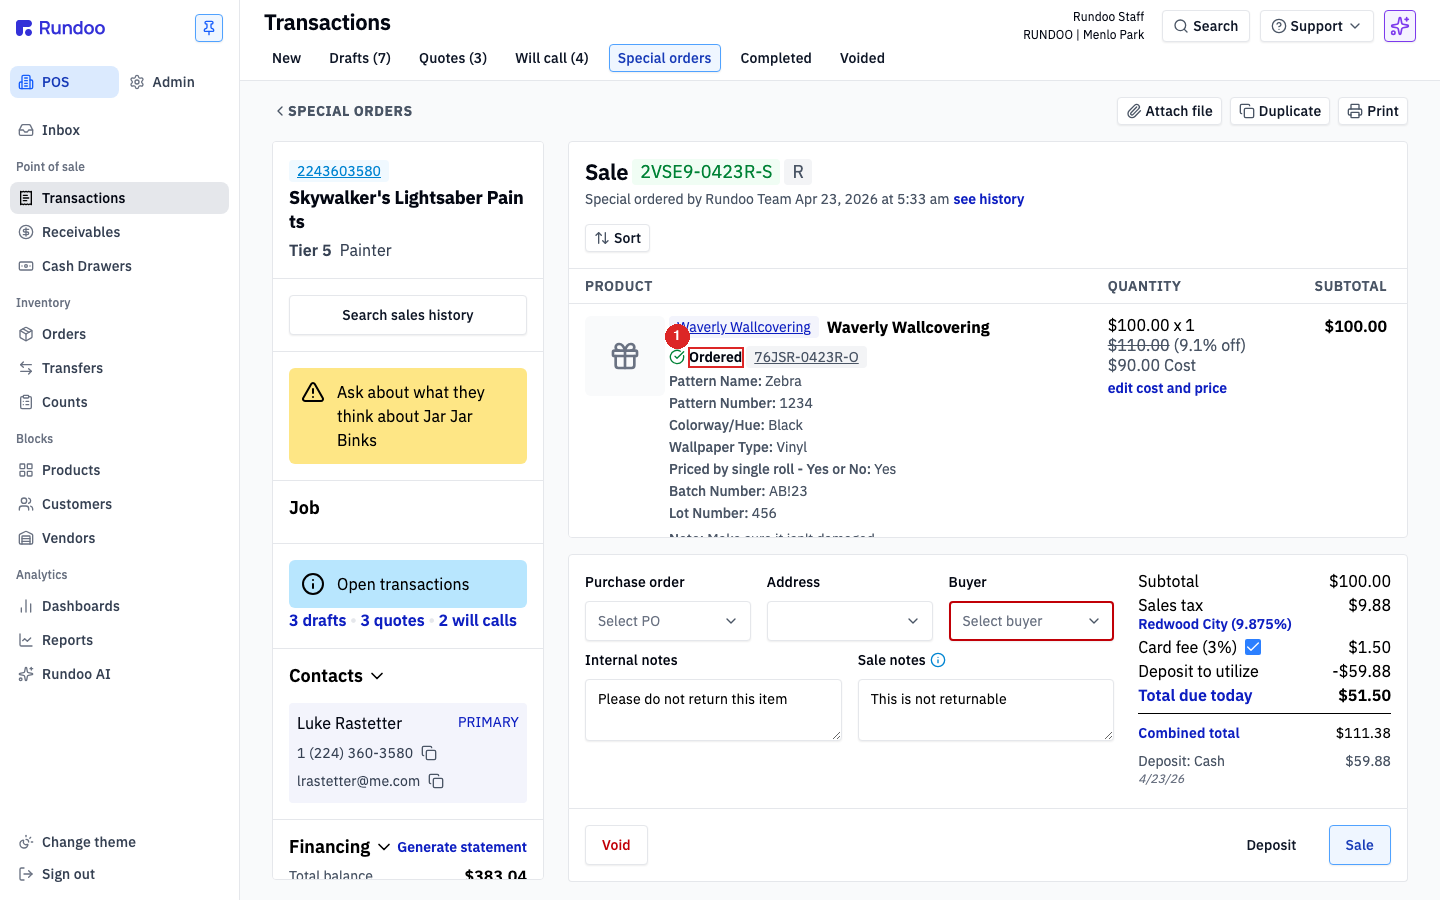
POS > Transactions > Special orders. Each row shows the customer, the product, and its current state (Created, Ordered, Received). -
The buyer side. The Orders > Buyers list top tab is the whole-store picture, one row per outstanding line, with
Needs orderflagging what isn't on a PO yet.
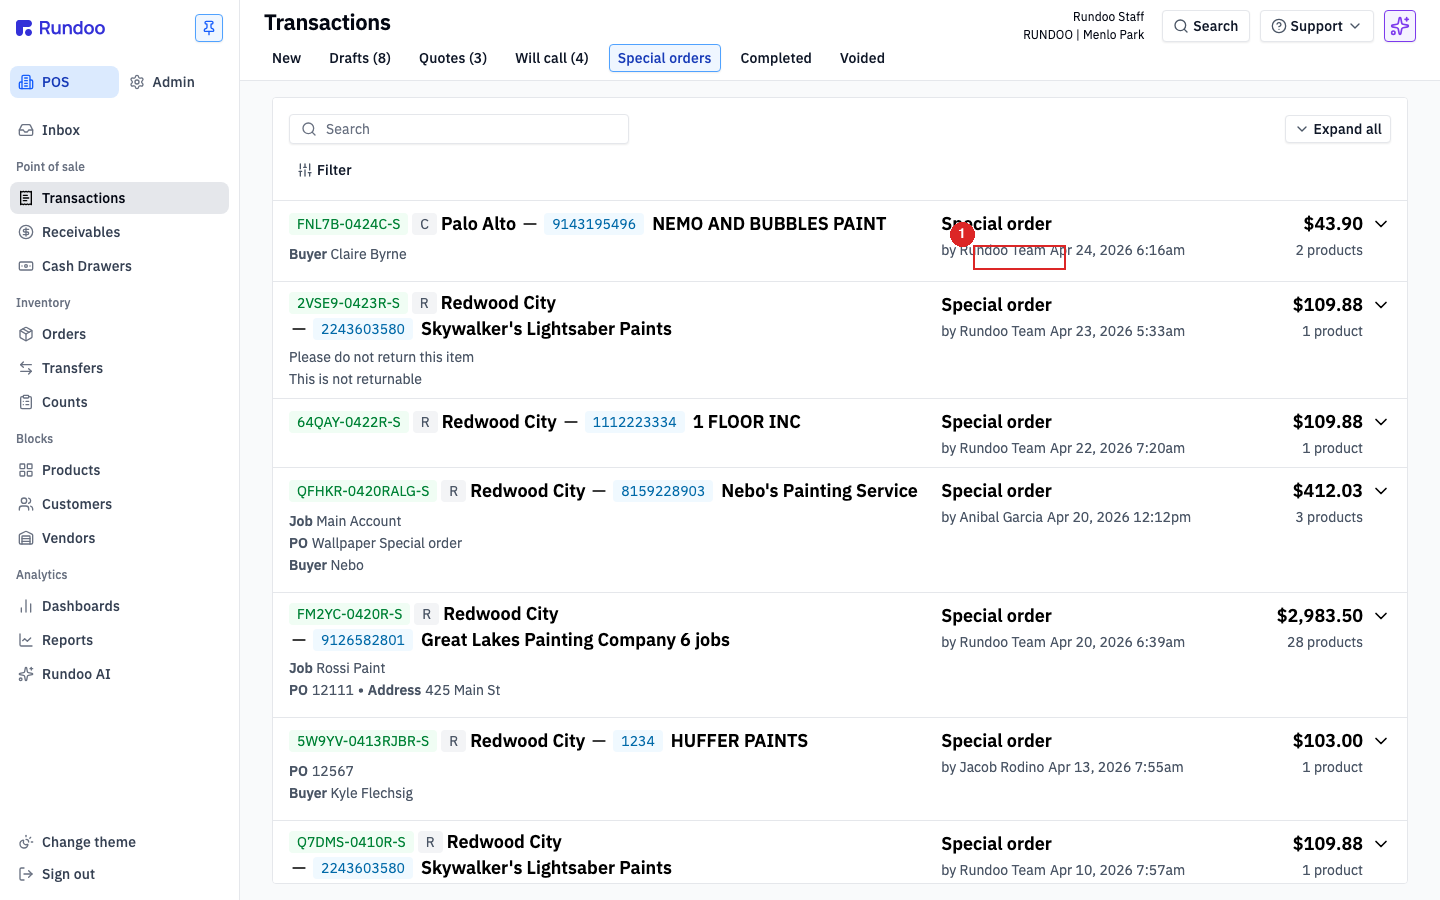
When the PO line is received, the special order's state updates to Received. Rundoo doesn't automatically notify the customer or flip a "ready for pickup" status. Open the row and reach out yourself (call, text, or email) so they know to come by. A good rule: if they haven't picked up in a week, ping again. Special orders tie up shelf space and working capital.
Step 7: Convert to a sale at pickup
When the customer arrives:
-
Open their special order from Transactions > Special orders.
-
Confirm the product and quantity match what they ordered.
-
Click Sale in the action cluster to ring up the whole order. Payment flows the same as any sale, cash, card, on-account, or mixed. If the customer paid a deposit when the order was placed, the
Deposit to utilizerow on the right subtracts it from theTotal due today.
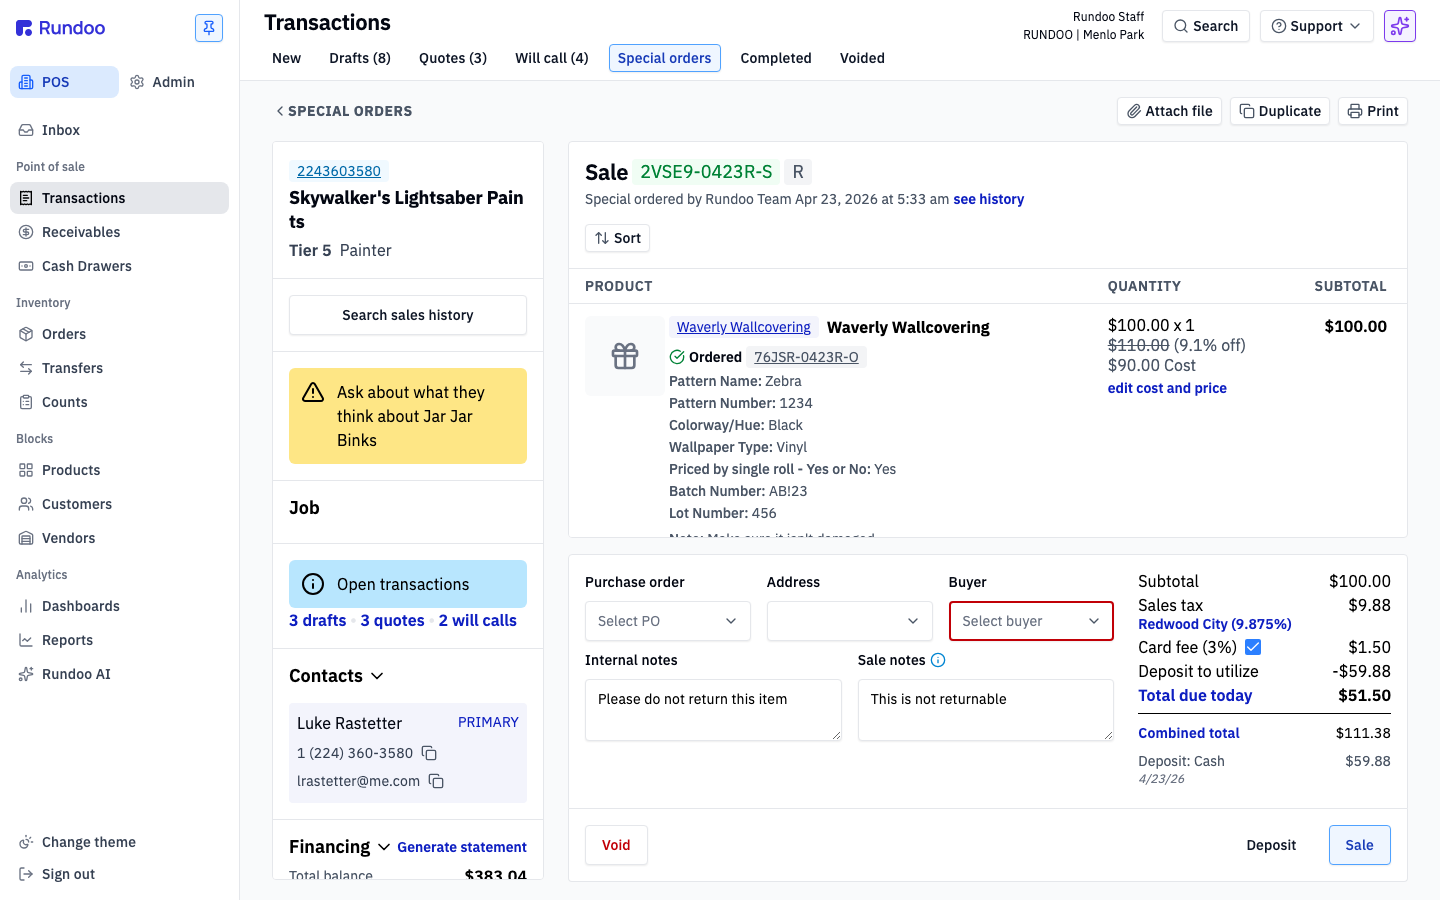
Handing over only part of the order? A saved special order (like a will-call) is read-only until you click Edit, and it carries a Close out button that lets the customer pick up and pay for part of the order now and the rest later, so a cart with a special-order line and in-stock product can be closed out in parts as the goods arrive. The mechanics (the per-line close-out stepper and the Overall / Closed out / Remaining totals) are the same as on a will-call, see Deposits and partial close-out.
💬 Canceling a special order. If the PO hasn't been sent to the vendor yet, you can void the special order cleanly. Once the PO's sent, the stock is coming whether the customer wants it or not, check your store's deposit policy and decide whether to restock it or eat the return.
Returning a special order
Special orders return through the same flow as any sale once they're in Sold status. Just bear in mind that the vendor PO is already paid and the goods are back in your inventory.
From Transactions > Special orders (or the customer's Sales history), filter to Sold status, click the sale, then Return. Pick the lines coming back, and apply a restocking fee if your store charges one for special-order returns (custom-cut, custom-mixed, or vendor-non-returnable items often warrant it). The fee logic and where to configure the percent live in Refunds & exchanges.
If the goods themselves can go back to the vendor, that's a separate return-to-vendor on the PO side; Rundoo doesn't auto-link the customer return to a vendor return.
Deposits for Special Orders
Deposits for Special Orders is how you ask a customer to put money down up front, so you aren't floating the vendor cost until they pick up. Two knobs drive the behavior: a store-wide default, and a per-order amount the cashier enters at save time.
The store-wide default
In the Admin > Product tab, the Deposits section has a single Default required deposit percent (ships at 50%). The percent is taken against the order's all-in total, subtotal plus tax and fees, so the deposit already covers what the customer will owe (there's no separate "include taxes and fees" checkbox to set). It applies to every new special order, regardless of whether the customer is a charge account or not (Rundoo doesn't skip the deposit automatically for charge-account customers).
To drop the required deposit to nothing across the board, set Default required deposit to 0. Every new special order will then show $0.00 as the required amount.
At 100%, rounding can leave a cent or two unaccounted on penny-heavy orders. Review the deposit before handing the customer the receipt.
Taking (or skipping) the deposit on a specific order
Open the special order from Transactions > Special orders. At the bottom-right of the action cluster, click Deposit (that opens an inline Deposit section with an Amount input and the usual tender picker (Cash, Card, Check, ACH, Gift card)). The placeholder shows the required amount (e.g. of $187.50) but the input accepts anything from $0.00 up.
To let a customer pay the full balance at pickup with no money down today: leave the Amount at $0.00 and click Charge $0.00. Rundoo logs a $0 deposit and the full balance rolls to Total due today when you convert the order to a sale at pickup (see Step 7). Whatever the cashier did collect shows as Deposit to utilize on that pickup sale, and Rundoo only charges the remainder.
💡 The per-order override is just for that one order. To stop collecting deposits on every special order going forward, change the admin default above.
See Finance terms for how a customer becomes a charge account in the first place, and Bill payments for how charge-account balances get paid down later.
Recommended Rundocs
-
Drafts, quotes & will-calls, holding an in-stock item for pickup.
-
Sales. The standard cash, card, and charge-account sale flow.