
Rundocs › Vendors & Purchasing
Purchase orders
Last updated 2026-08-17
A purchase order is how you restock from a vendor. Draft it, send it, receive it when the truck shows up.
In the POS mode, open the Orders left tab (that's where every PO lives).
The Orders list
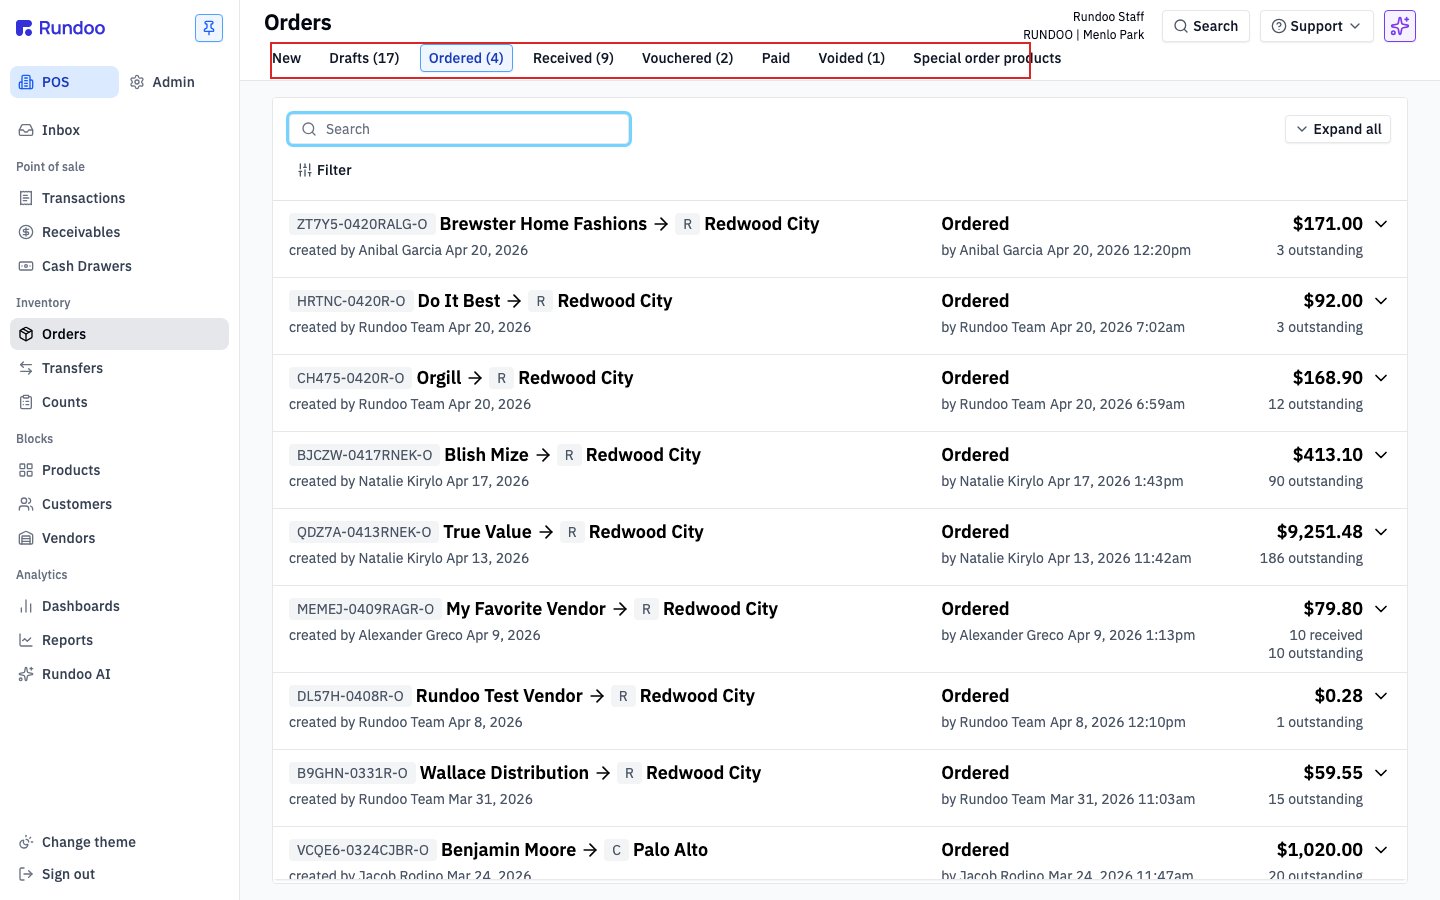
The top-tab strip on Orders is the PO lifecycle, left to right. Each tab is a stage a PO moves through.
-
New(the empty builder); start a fresh PO here. -
Drafts(in-progress POs saved but not yet submitted to the vendor). -
Ordered, sent to the vendor, waiting on the truck. -
Received(stock is in); invoice details still to record. -
Vouchered(invoice recorded; ready to be paid). Kicks the PO over to your accounting side. See Vendor invoices for what the invoice form is doing. -
Paid(marked paid). -
Voided(canceled before completion). -
Buyers list. Products on an in-flight PO that were triggered by aSpecial orderon a sale. See Special orders.
Each tab shows a live count of POs in that state.
Step 1: Start a new order
Open the New top tab (or click Orders in the left sidebar, it lands you here by default). You'll see the PO transaction-builder: Order from on the left, product search in the middle, totals on the right, and the action cluster at the bottom.
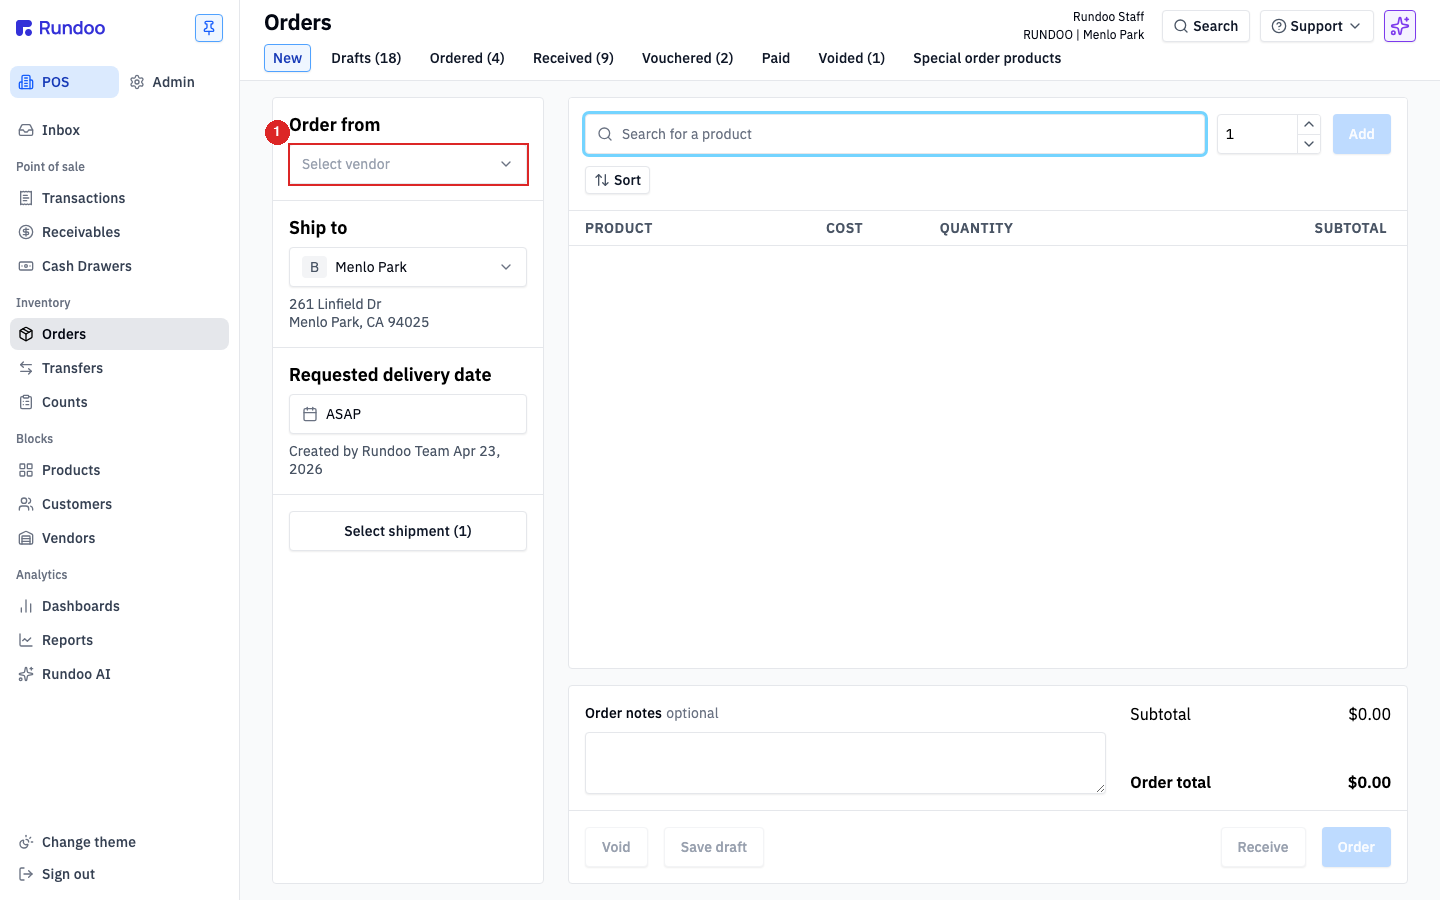
The Order from dropdown is the only required field to get started. Pick a vendor and the builder unlocks. Side-panel fields appear, product search becomes active, and the Order button on the bottom right lights up once the cart has a line.
Rundoo doesn't flag missing fields when you click Order or Save draft on an empty PO. The button just does nothing. If nothing happens when you click, double-check you've picked a vendor and added at least one product.
Step 2: Pick a vendor
Click Select vendor and type to search. The dropdown matches on vendor name. Don't see the vendor you want? They probably haven't been added yet. See Vendors to create one.
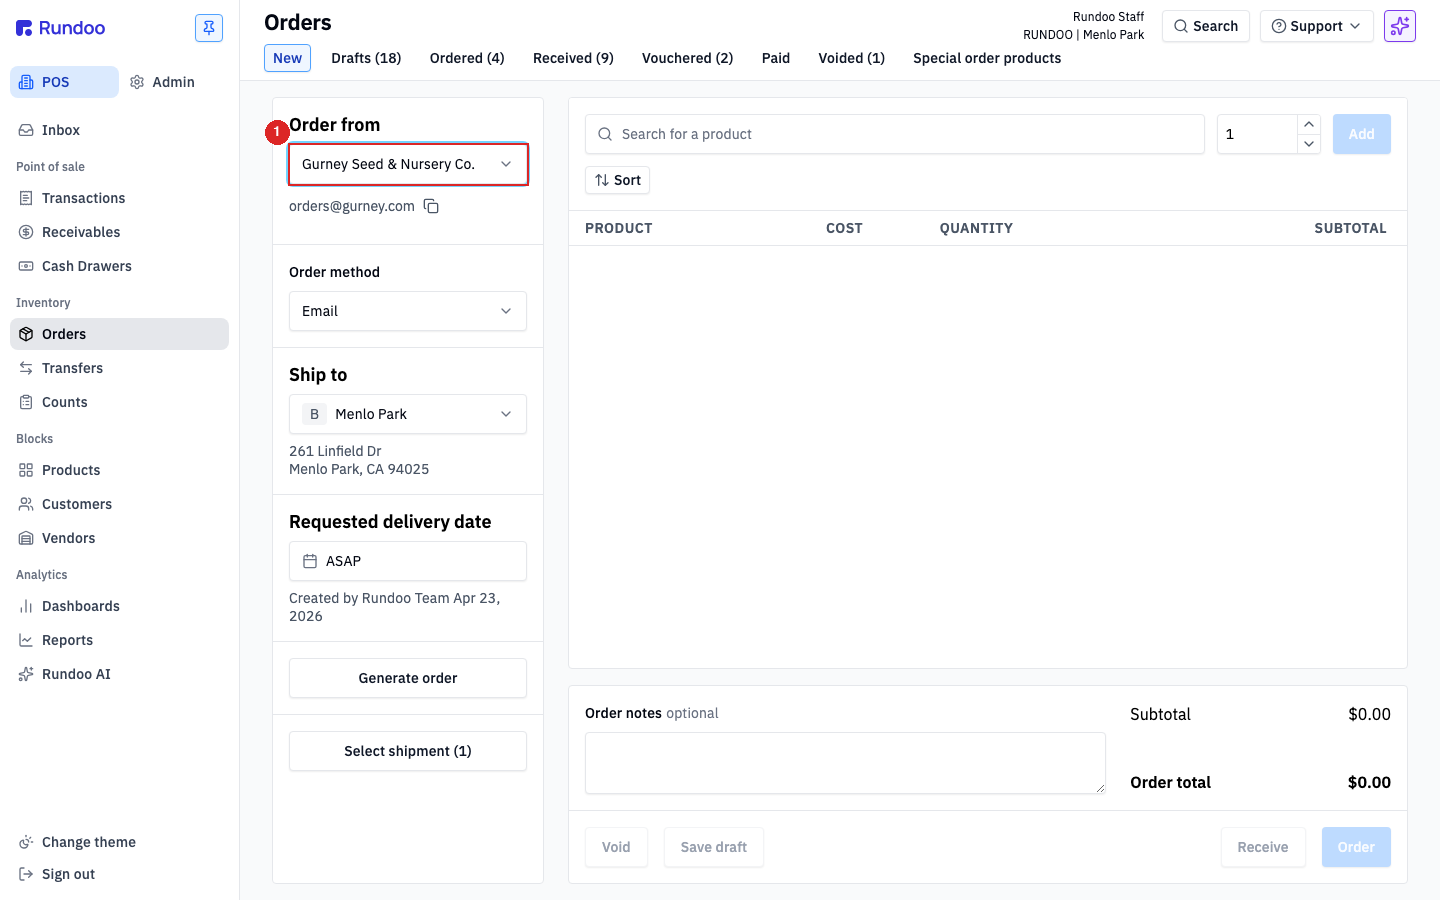
Once selected, the side panel fills in:
-
Order method(how this PO will actually get to the vendor (email, print, etc.)). Defaults to the vendor's configured method. See Step 4. -
Ship to, the location the stock is coming to. Defaults to your current location; switch if you're ordering for another store. -
Requested delivery date, a target date for the vendor. Defaults toASAP. -
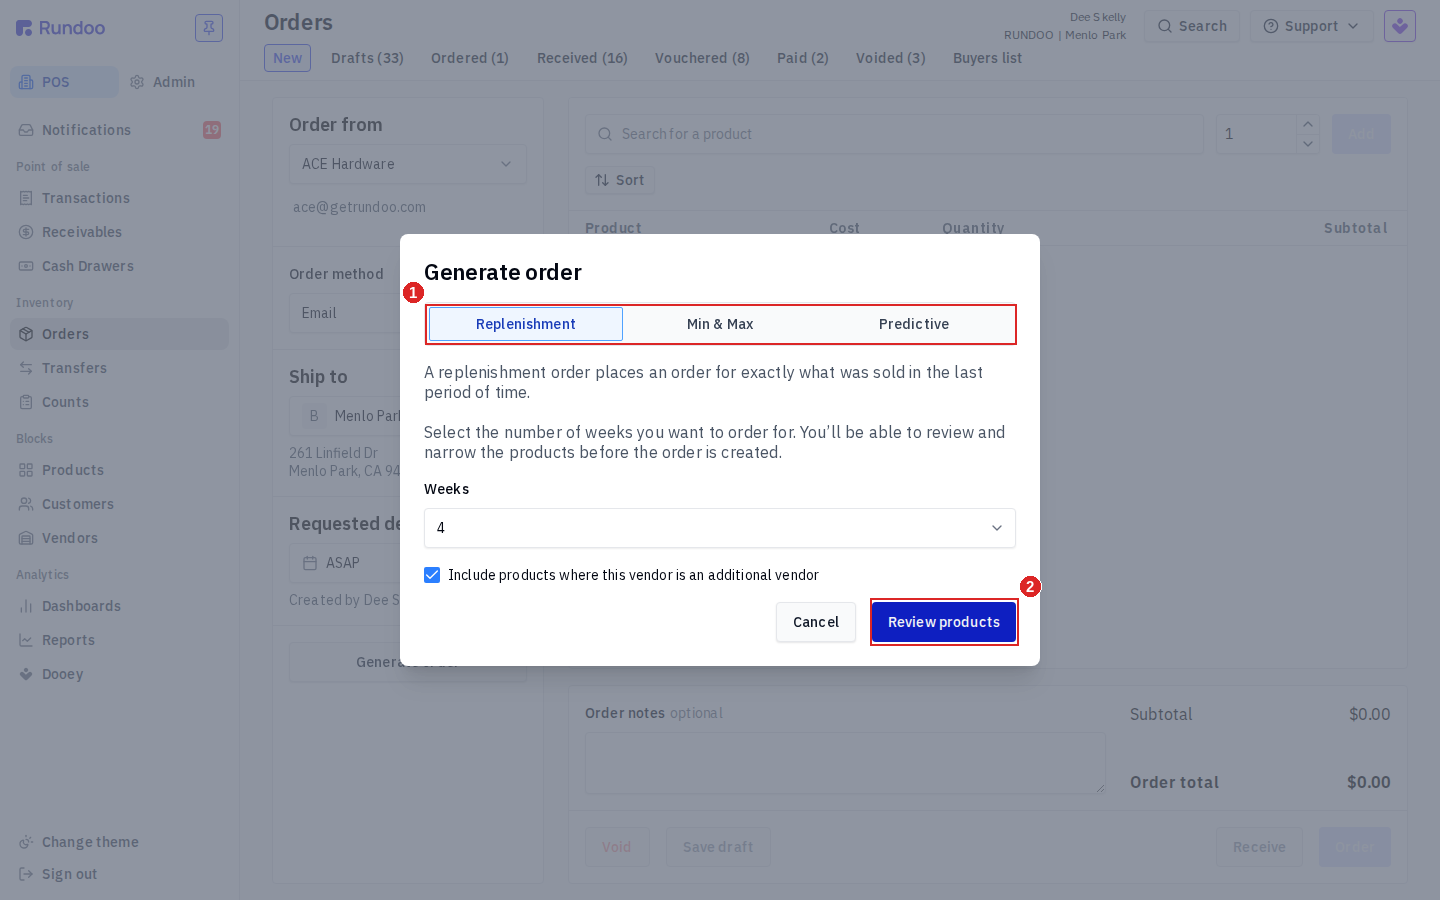
Generate order, a Dooey button that proposes an order for you. Click it and a modal opens where you pick one of three algorithms (Replenishment,Min & Max, orPredictive), then review and narrow the proposed products before they land on the cart. See Generate order: Replenishment, Min & Max, and Predictive below. -
Select shipment(for split shipments across vendor warehouses). Most POs only have one shipment; leave it alone unless you need to split.
If your vendor is one of Rundoo's Vendor Catalogs (Benjamin Moore, Do It Best, True Value, Orgill) the builder reads live cost and availability straight from the catalog feed. Benjamin Moore specifically has its own order flow that pulls live availability from BM's ordering system and handles their SKU structure natively. See Benjamin Moore orders.
Step 3: Add products
Click Search for a product and start typing. Match on SKU, name, or vendor SKU. Use the quantity stepper to the right of the search box to set how many before clicking Add, or just type the number into the line's QUANTITY cell after it's on the cart. The product-search box also accepts barcode scans. If you've got the catalog in front of you and a scanner at the counter, scanning a UPC drops the matching product onto the cart without typing.
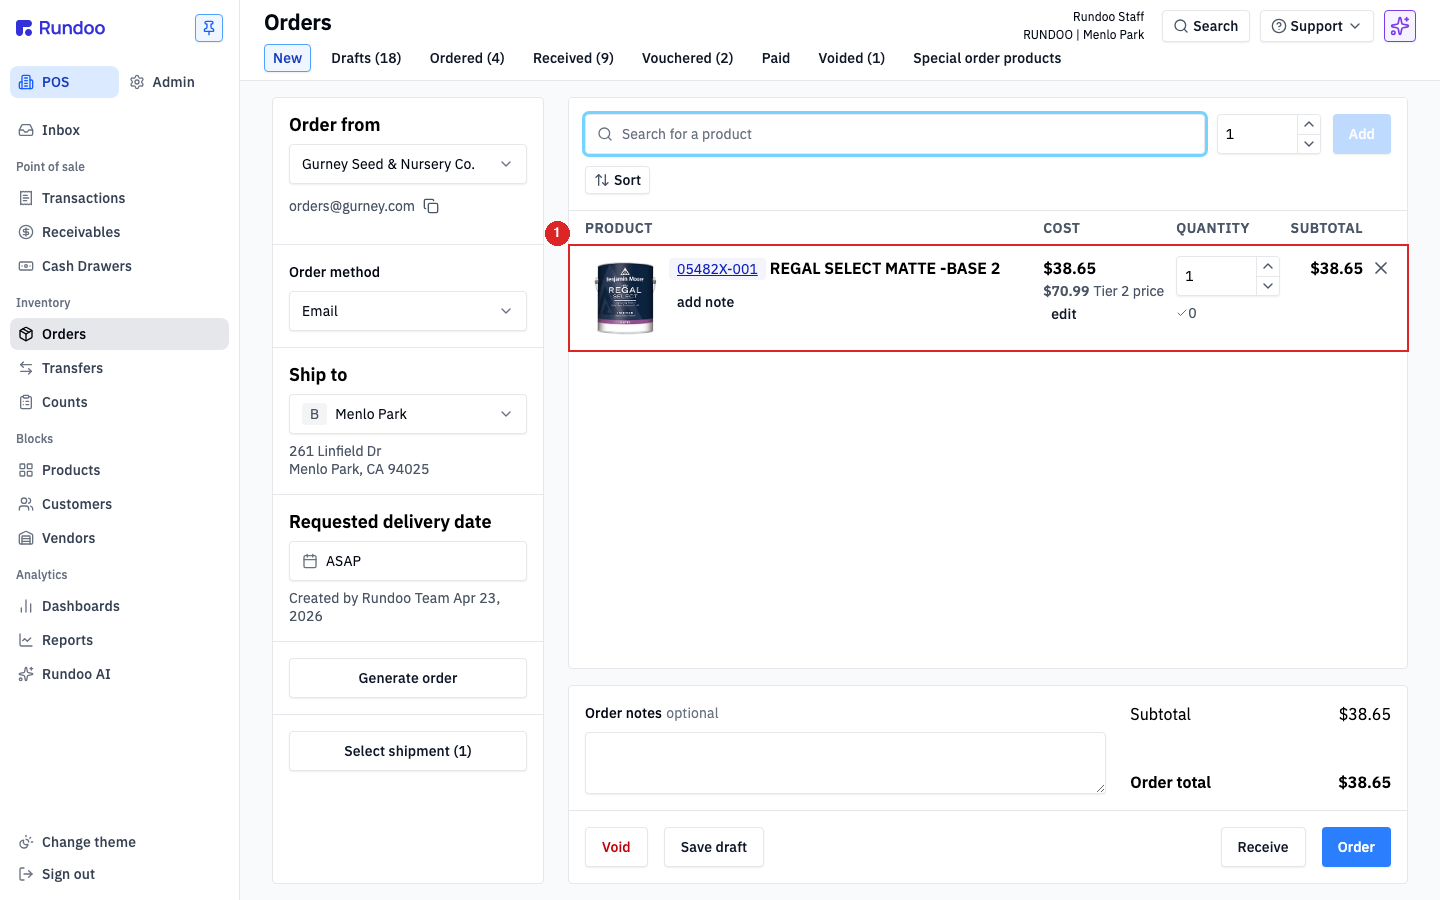
Each line fills the table with PRODUCT, COST, QUANTITY, and SUBTOTAL columns.
-
COSTis the unit cost Rundoo will bill the vendor at. Defaults to the product's vendor cost. Click edit under the cost to override for this PO (contract pricing, one-off spiff). -
QUANTITYis how many units you're ordering. The stepper increments by one; click in and type for larger numbers. -
SUBTOTALupdates live as you change cost or quantity. -
add notelets you attach a line-level note for the vendor (e.g. "substitute OK" or a customer name for a special order). Notes appear on the emailed/printed PO.
Generate order: Replenishment, Min & Max, and Predictive
The Generate order Dooey button opens a modal with three algorithms to choose from. Pick one at the top, set its options, then click Review products.
-
Replenishment reorders exactly what you sold. Set
Weeks(call itN) and Rundoo proposes, per product, the quantity you sold over the lastNweeks. Simple and fast, with no growth or seasonal math. -
Min & Max tops your shelf back up. Every product at or below its per-location
Minthreshold (set on the product's Inventory tab) is included and ordered up to itsMax, in multiples of itsCase Quantity. Faster to set up, but ignores velocity: a fast mover and a slow mover with the same Min/Max get the same suggestion. There's noWeeksinput for this one. -
Predictive is a year-over-year forecast that blends growth and seasonality. You set
Weekson the modal (call itN), the number of weeks of cover you want. For each product, Rundoo first measures your recent growth: units sold in the lastNweeks this year divided by units sold in those sameNweeks one year ago. It then applies that growth factor to what you sold in the nextNweeks last year, the same calendar window you're about to order for, so the season is already baked in. The suggested quantity is(units sold in the next N weeks last year) x (units sold in the last N weeks this year / units sold in those same N weeks last year), rounded up to the product'sCase Quantityso you don't order partial cases. Because every term needs a full year of history, Predictive only suggests a quantity for products that sold in all three windows. Newer products are skipped, andMin & Maxis the better fit for them.
Every algorithm also carries an Include products where this vendor is an additional vendor checkbox, on by default, so products where this vendor is a backup (not the primary) supplier are considered too.
Replenishment is quickest when you just want to rebuy what moved. Predictive suits paint and hardware where velocity matters. Min & Max fits slow-moving SKUs where you want a fixed shelf level. You choose per order in the modal, the default selection is Replenishment. The Generate orders when below min stock toggle in Product settings controls the exact point at which Min & Max flags a product (at its min vs strictly below its min).
Narrow the order before it's created
Whichever algorithm you pick, Review products doesn't drop the proposal straight onto the cart. It opens a product grid so you can review and trim the suggestion first, then click Generate order to push what's left onto the PO.
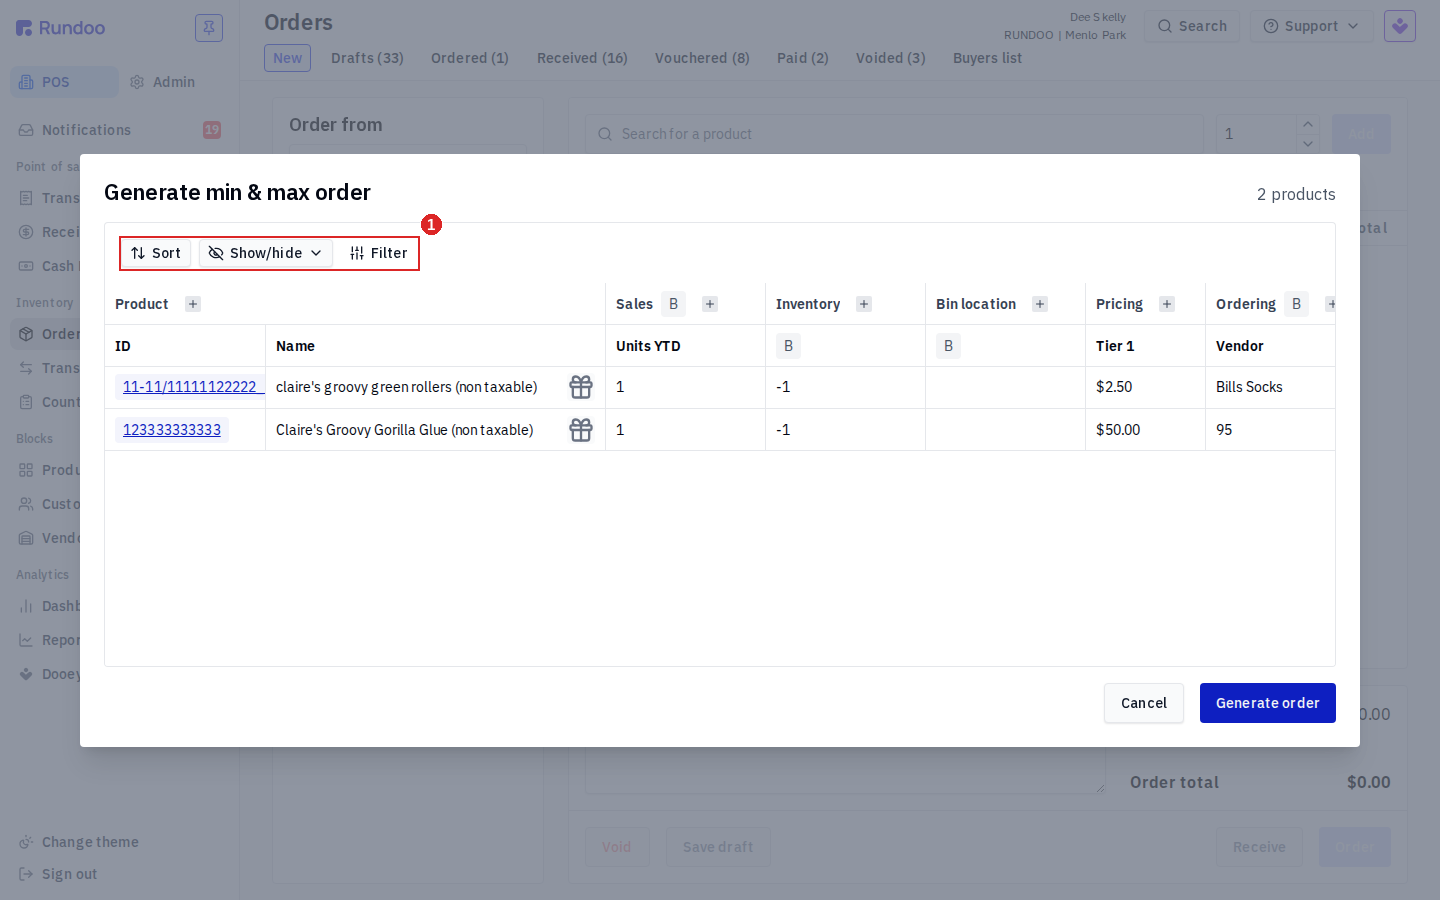
Use Sort to reorder the list, Show/hide to change which columns show, and Filter to cut the proposal down. Filter is the one that matters for large orders: filter the proposed products by Department, Class, Fineline, or Product tag so you can generate an order for just one part of your catalog at a time instead of the whole thing at once. Only the products still showing when you click Generate order land on the PO.
Step 4: Choose how to send the order
The Order method dropdown on the left panel decides how the PO reaches the vendor when you click Order:
-
EDI, only appears for vendors with an active EDI integration paired (Orgill, Benjamin Moore via the BM order flow, True Value, Do It Best). Sends the PO directly through the vendor's electronic-ordering pipe, which is faster and more reliable than email for vendors that support it. -
Email. Rundoo emails the PO PDF to the vendor's configuredOrders emailaddress (shown under the vendor dropdown, e.g.orders@gurney.com). -
Mark ordered(doesn't send anything externally); the PO moves intoOrderedstate on your side so you can track it, but you're responsible for getting the order to the vendor yourself (a phone call, a print + fax, etc.).
No Orders email set on the vendor + no EDI = no Email option. When the vendor has neither an EDI integration nor an Orders email configured, the Order button shows a yellow banner reading "This vendor has no Orders email set up. Add one in Vendors > {Vendor} > Settings, or use Mark ordered instead." Only Mark ordered and Receive work in that case. Add the vendor's orders email at Vendors → the vendor's Settings tab to unlock Email.
The exact list depends on what the vendor has configured. Change the default order method at the vendor level in Vendors.
Step 5: Place the order
The action cluster at the bottom right has four terminal verbs for a PO:

-
Void(cancel the PO). Available on drafts andOrderedPOs. Once a PO isReceived,Vouchered, orPaid, the button is gone. See "Voiding, canceling, or undoing an order" below for how to back out a received PO. -
Save draft. Stash the PO in theDraftstab without sending anything. Safe to come back to later. -
Receive(skip the "send to vendor" step and mark the stock as received immediately). Useful when the truck showed up without a PO on the books and you're backfilling. -
Order, the primary action. Sends the PO to the vendor per theOrder methodabove and moves the PO into theOrderedtab.
Click Order when the cart is right. Rundoo fires the email or print job, drops a green confirmation banner at the bottom of the screen, and moves the PO into Ordered.
Receiving a PO
When the truck arrives, open the PO from the Ordered tab and click Receive to log what actually showed up. You have two paths, depending on whether the shipment was complete.
-
Receive and close. Every line got what you ordered (or you're done ordering the shortage elsewhere). The PO moves to
Received, stock counts update, and theQUANTITYcolumn shows each line as "N of N" received. -
Receive and backorder. Part of the shipment came in; you want Rundoo to keep the rest on the PO. Edit each line's received quantity to what actually arrived; Rundoo keeps the remaining units as backordered on a new shipment so you can receive them when they land.
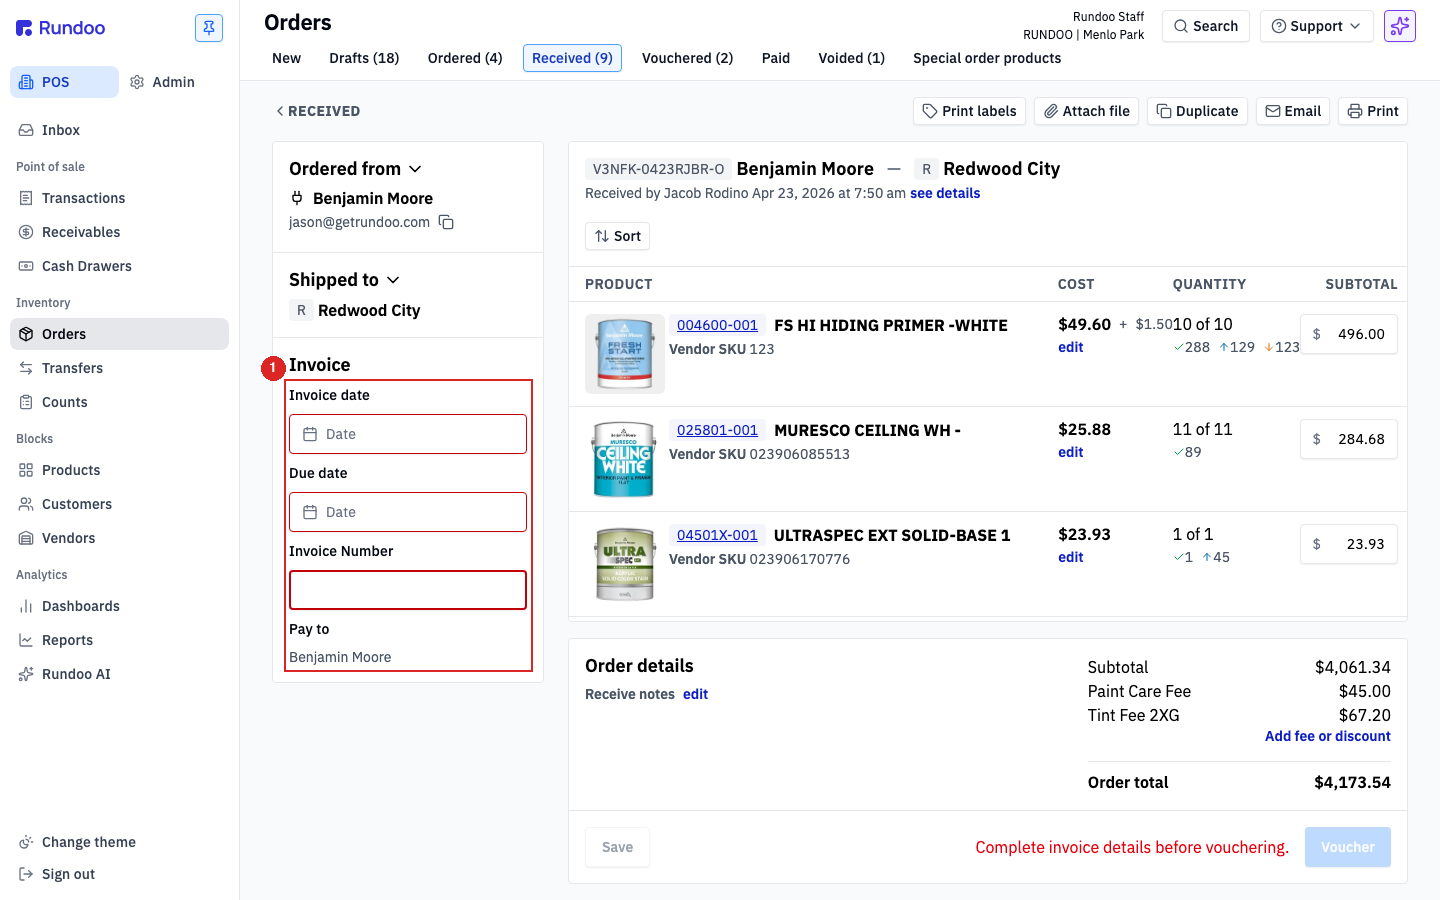
The Received detail view is also where you log the vendor invoice (Invoice date, Due date, Invoice Number, and the Pay to vendor). Once the invoice details are complete, Voucher at the bottom right moves the PO into the Vouchered tab, which is where your accounting side picks it up. If the invoice doesn't match what you received (wrong cost, missing discount, credit owed) see Order receipts for how to record the adjustment.
Receiving also updates on-hand inventory. If you receive 24 units of a product, your count for that location jumps by 24 the moment you click Voucher (or Save on the received PO).
Default the receive form to zero (Admin setting). By default, opening an Ordered PO to receive pre-fills each line with the ordered quantity, so cashiers confirm what came in. Some stores prefer the inverse, start every line at 0 and have staff type in what actually arrived. Toggle Start all Ordered Orders at zero quantity to receive in Admin > Product under the Order product settings section. With it on, the receive view opens with every QUANTITY cell at 0 until staff fills it in.
Freight charges and PO-level discounts
Freight, surcharges, and invoice-level discounts are recorded against the PO itself, not pushed into each line's unit cost. On a received PO, use Add fee or discount in the Order details panel to layer the charge onto the PO total. The amount flows through to your accounting side as part of the PO's COGS when you voucher, it doesn't pro-rate across the line items to change what each product's unit cost becomes.
If you want the freight or discount reflected in the per-unit landed cost on a specific line, edit that line's COST cell on the receive view directly. See Order receipts for the full receive-time cost adjustment flow, and Cost method for how unit cost is tracked on each product.
Drop-shipping to a customer
Some vendors will ship directly to your customer's job site instead of to your store. That's a drop-shipment, and you set it up on the PO by changing the Ship to field.
Click the Ship to dropdown on the left side-panel and pick Use custom address, then fill in the address Rundoo should send the vendor. The Name line is a good place to put the customer or job name, or the customer's PO number, whatever helps the vendor's receiving team identify the shipment. Everything else on the PO works the same way: pick products, send the order, receive when the stock lands at the destination.
Sign in under the location where the original sale was rung. When a drop-shipment is tied to a customer sale (a Special order, for example), the PO's owning location should match the sale's location. That's how Rundoo keeps the customer's history, cost, and invoicing aligned. If you're ordering from a different store than the sale was rung at, sign out and sign back in at the right location first.
One drop-shipment per PO. If a single customer has stock coming from two vendors, that's two separate POs, each with its own custom Ship to address.
Voiding, canceling, or undoing an order
To undo a purchase order (void it, cancel it, or back out an order you've already received), the path depends on what state the PO is in. Click Void on a draft or Ordered PO to cancel it. The PO moves to the Voided tab and no stock is affected (an Ordered PO hasn't taken in any stock yet, so voiding it just cancels the order). Once a PO is Received, Vouchered, or Paid, the Void button is gone, because stock or accounting has already moved. After that you undo it by backing it out (below), not by voiding.
A one-click way to void a received order is a popular feature request. Want this? Vote for it on the Idea board at rundoo.nolt.io/265.
Backing out an Ordered-state PO (the order was sent to the vendor but no truck has arrived yet): the simplest path is to click Void on the PO. It moves to the Voided tab and no on-hand stock is affected. If you'd rather keep the PO on the books as a zero receipt instead of voiding it, receive it with Set quantities to 0 at the top of the line list, then click Receive and close. Rundoo treats every line as zero-received and closes the PO out without affecting on-hand stock. Either way, call or email the vendor separately to cancel, Rundoo doesn't notify them.
Backing out (undoing) a Received-state PO (stock already landed and on-hand is updated): to undo a received order, say you received it against the wrong vendor or received it by mistake, create an offsetting receipt with negative quantities for the lines coming back out of inventory, or duplicate the PO with the negative quantities on each line and receive that. The original PO stays where it is; the offsetting one cancels its inventory effect. See Order receipts for the receive-time mechanics.
Ordered and Received POs are editable. Open the PO and click edit to correct a line's quantity or cost, fix the vendor invoice details, or add a fee or discount, then click Save. Use this to fix a mistake on the order itself. Voiding (drafts and Ordered POs) and the offsetting-receipt path above are for canceling or reversing an order, not for a small correction.
Recommended Rundocs
-
Vendors, setting up the vendors you order from.
-
Order receipts, recording adjustments when the invoice doesn't match what arrived.
-
Benjamin Moore orders (the BM-specific order flow for paint retailers).
On mobile
The Rundoo POS mobile app's Orders bottom-tab shows the same POs that live on the web's Orders surface, scoped to the signed-in staff's location. It's read-focused, drafting a new PO and emailing/EDI-sending it still happens on the web.
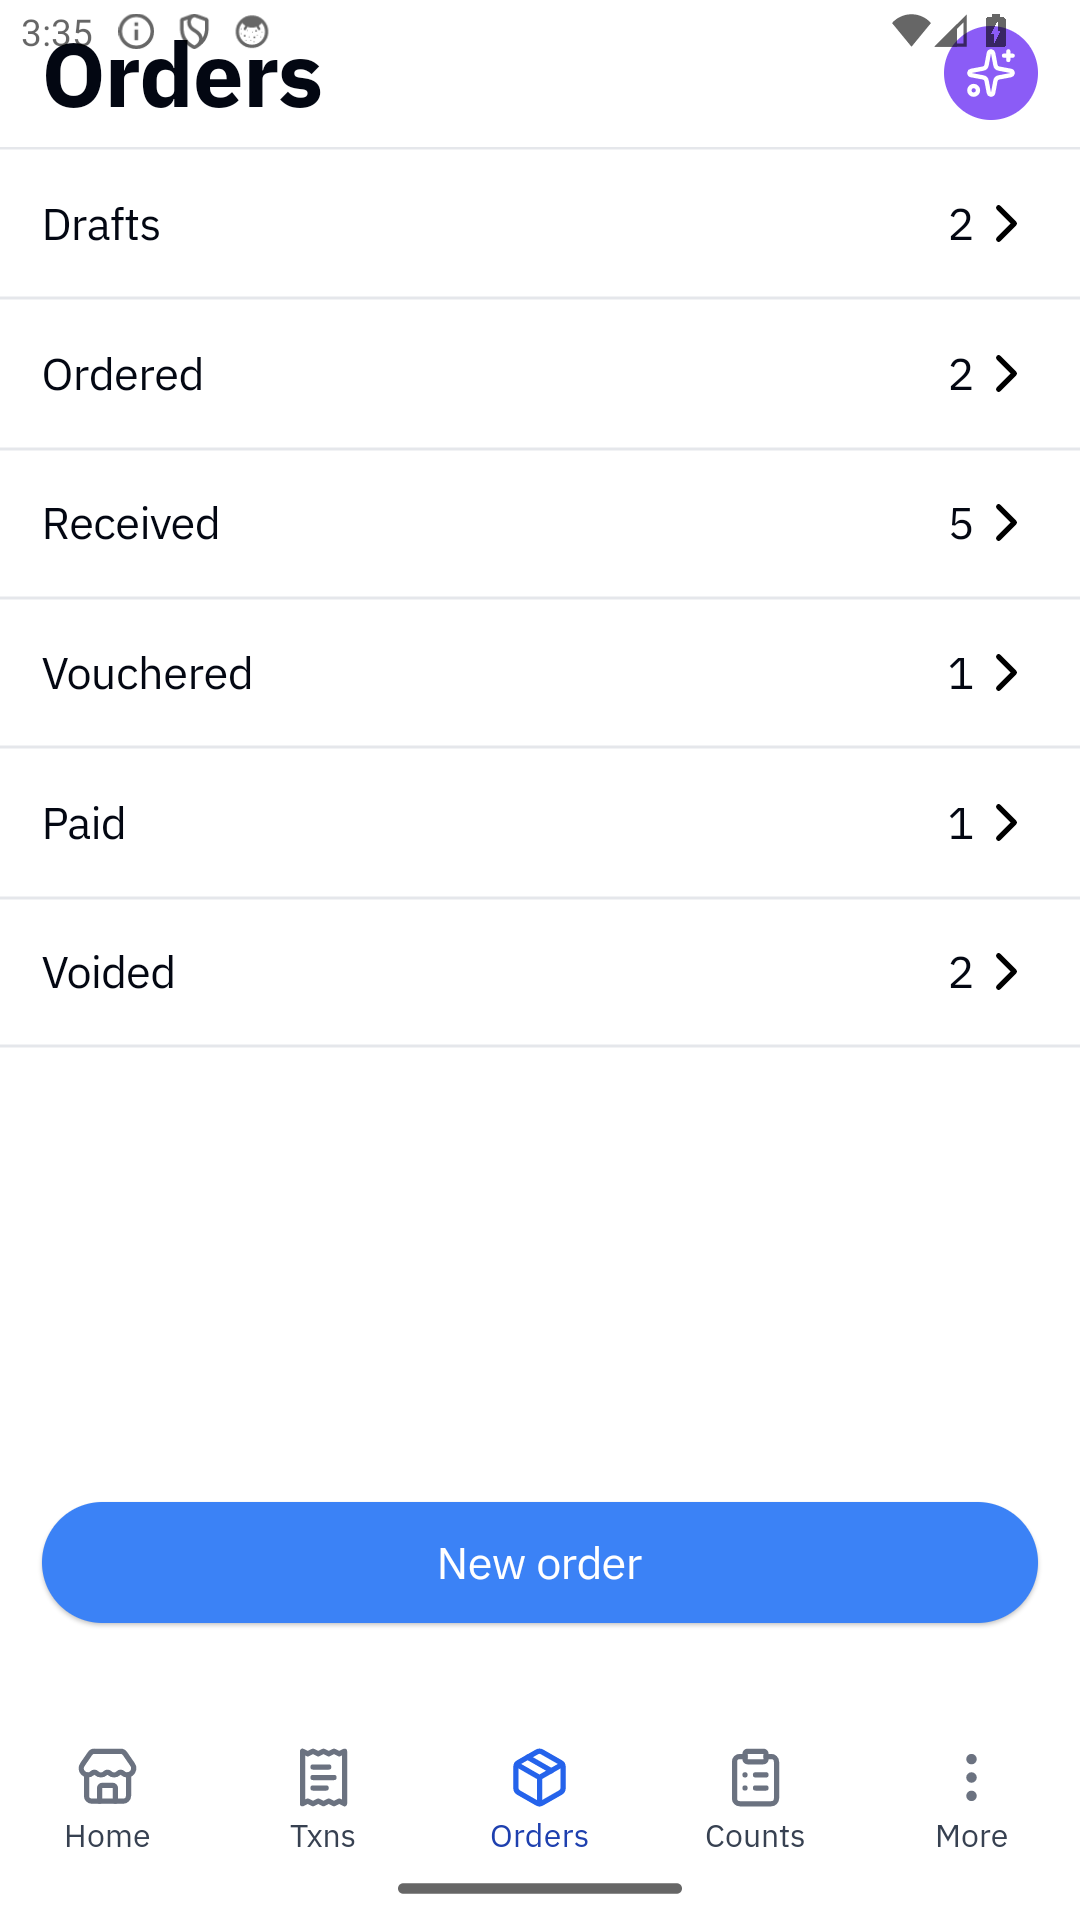
The Orders tab lists every status row in the PO pipeline (Drafts, Ordered, Received, Vouchered, Paid, Voided) each with a live count. Tapping a row drills into POs in that status. The blue New order button at the bottom starts a new PO directly from mobile, no need to go back to the web.
💡 Receiving a PO on mobile is the killer feature here. Stand next to the truck, scan products in, increment received quantities without going back to the desk. That subset of actions is enabled even on read-focused tabs.