
Rundocs › Vendors & Purchasing
Order receipts
Last updated 2026-10-22
Receiving is how you log what actually came off the truck against a purchase order (close it out if the shipment was complete, keep the rest on backorder if it wasn't). It's also where you record the vendor's invoice and move the PO toward accounting.
In the POS mode, open the Orders left tab, then the Received top tab. That's where past receipts live. You receive a new shipment by opening a PO from the Ordered tab.
Receiving an already-placed PO happens on the web, not the mobile app. If you open a PO from the Ordered tab in the Rundoo POS mobile app there's no Received button, which is expected, not a bug. The mobile app only receives orders you build on the phone as you scan the shipment in (a new order or a mobile draft). To receive a PO that was already ordered from the desk, do it on the web. See Purchase orders → On mobile.

How receiving works
Receiving a PO does two things at once:
-
Stock lands. On-hand inventory at the
Ship tolocation goes up by however many units you record as received on each line. The moment you save the receipt, the count is live. A sale rung up the next minute can pull from it. -
Costs can be adjusted. The
COSTcolumn on the receive view is editable. If the vendor billed a different unit cost than what you ordered at (contract override, price change since the PO was cut) correct it here. That cost flows through to the GL and to the product's cost. Order-level charges like freight and surcharges are handled separately and can be spread across the lines automatically, see Landed cost below.
Receiving does not pay the vendor. That happens after you voucher the receipt (see After receiving, vouchering below).
A received shipment stays editable. As of September 2026 you can reopen a committed receipt and correct it in place. Open the PO from the Received tab and the detail view lets you adjust each line's received quantity with its stepper, click edit to fix a line's COST, add a product that never got logged (the Search for a product bar and Add button at the top), or drop a line with its ✕. Click Save to commit the correction, and on-hand inventory moves to match what the receipt now says, so only save once the numbers are right. (Older Rundoo locked a receipt the moment you committed it, and the only fix was an offsetting receipt with negative quantities. That workaround still works and is the path once a receipt moves on to Vouchered or Paid, but for a plain quantity, cost, or missing-item fix you rarely need it now.)
The top-tab strip on Orders is the lifecycle: Ordered → Received → Vouchered → Paid. Each tab is a stage a PO moves through on its way from "stock is on the truck" to "bill is settled."
Ordered quantity vs received quantity
There are two quantities on a received order, and only one of them stays editable. Once a PO has a shipment (once it's been received) the ordered quantity is final. What you can still change is the received quantity. So if you're looking at a received order and trying to edit the number you originally ordered, that's expected behavior, not a bug: the ordered figure is locked once the shipment exists.
Open a received PO from the Received tab and each line shows this in the Quantity column: a − N + stepper for what you received (still editable), the original ordered count beside it as plain text (of 10 in the example), and a Variance column that flags how the received count compares to what was ordered.
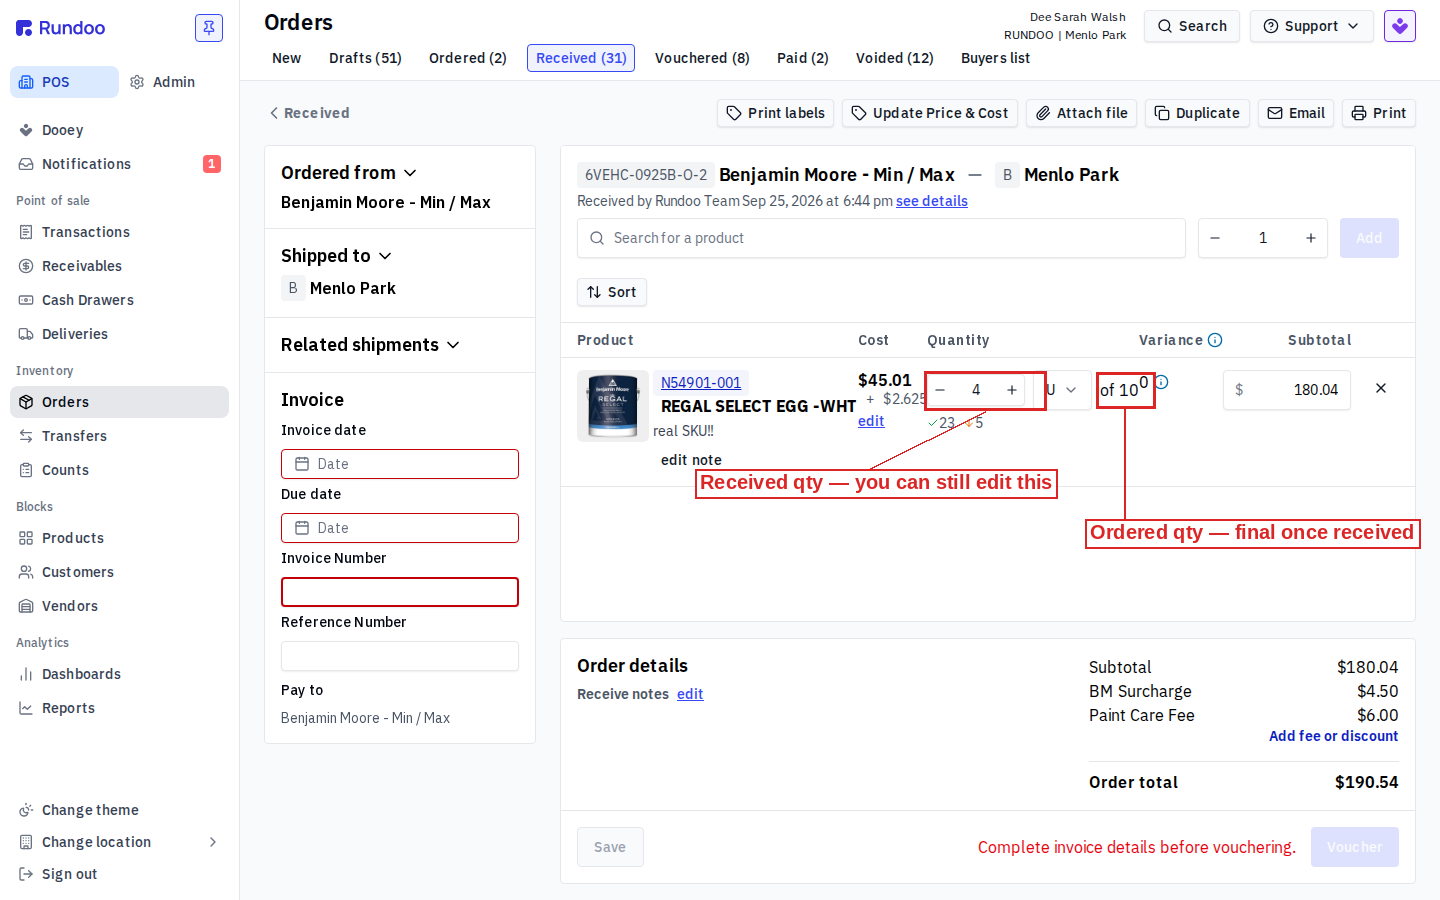
Locking the ordered number doesn't cost you anything. The moment a shipment is created, the ordered quantity is released from on-order, and from that point only the received quantity affects your inventory and cost. The ordered figure is just the record of what you asked the vendor for. Changing it would move nothing about your stock or your accounting, which is why there's no need to edit it. If a received order is wrong (you received 6 against an order of 5, or keyed 4 when 5 came in), fix the received Quantity on the shipment and click Save, and on-hand moves to match.
Fix the received count, not the order. When a received order looks off, the number to correct is the received Quantity (the stepper), not the ordered figure, which is display-only once the shipment exists. Correcting the received quantity is what moves on-hand inventory; the ordered count no longer touches stock at this stage.
Receive and close vs Receive and backorder
Open an Ordered PO and the detail view comes up in receive-editor mode (a QUANTITY cell per line showing the expected quantity and a stepper for what you actually received).

The stepper starts at the expected quantity. Change it for any line where the count differs. Rundoo shows the remaining delta below the stepper (-N if short, +N if over) so you can see at a glance what's off. Set quantities to 0 at the top of the line list is a one-click reset if you'd rather key each line from zero.
Two action buttons sit at the bottom right. That's the decision point for what happens to the PO next:

-
Receive and backorder(save what came in and keep the missing units on the PO as a backordered shipment) Use this when part of a shipment is in and you want Rundoo to track the remainder. The PO stays inOrdered; a new shipment appears for the backordered units, which you'll receive when they land. Stock is credited for what you received today; nothing happens to the backordered units until they show up. -
Receive and close(save what came in and treat the PO as done). Use this when the shipment was complete, or when a partial shipment is all you're going to get and you don't want Rundoo chasing the rest. The PO moves to theReceivedtab and the remaining quantities are written off.
The buttons don't appear until at least one line has a received quantity. Clicking either fires off the update, drops a green confirmation banner at the bottom, and navigates you to the received-PO detail.
Receiving updates on-hand inventory immediately. Don't click Receive and close until the stock is physically on the shelf. The quantity change is live the moment you commit.
Partial receives
If the truck shows up light, use Receive and backorder. Set the QUANTITY stepper on each line to what actually arrived, leave lines that didn't come in at zero (or use Set quantities to 0 and key in what did arrive), and commit.
Rundoo splits the PO into two shipments behind the scenes: the first is now Received (with what came in today), and a second shipment holds the backordered units. The PO stays in Ordered status until the second shipment is fully received, then Rundoo rolls it into Received.
You can come back to the same PO the next day, open the outstanding shipment, and receive more against it. Keep doing that until the PO is closed.
Handling discrepancies
Real shipments go wrong in a handful of predictable ways. Here's how to log each:
-
Short ship (fewer units than ordered). Edit the
QUANTITYstepper down to what actually arrived. If you expect the rest, Receive and backorder. If the vendor is out of stock or you gave up on the rest, Receive and close. Rundoo writes off the unreceived units. -
Over ship (more units than ordered). Edit the
QUANTITYstepper up past the expected quantity. Rundoo shows a+Ndelta below the line and will still accept the receipt. The extra units get on-hand credit. The vendor's invoice should reflect the higher count; make sure theInvoice Numberyou record matches what they billed. -
Damaged units. Two paths depending on your return policy. If the vendor will replace the damaged units, receive the full count (so your accounting matches the invoice) and handle the replacement as a Vendor invoices credit or a return. If the vendor won't replace, receive only the undamaged count and use Receive and backorder to keep the damaged count outstanding while you dispute, or Receive and close and take the hit.
-
Cost doesn't match the invoice. Click edit under the
COSTcell on the line. Update the unit cost to what the vendor actually billed. Subtotals and the order total recompute automatically. -
Freight, surcharges, discounts on the invoice total. Use
Add fee or discountin the Order details panel at the bottom right of the received-PO view to add vendor-level charges to the receipt. You can leave them on the order total, or have Rundoo spread them into each product's per-unit landed cost, see Landed cost. -
A receipt you already committed is wrong, or is missing an item. Open the PO from the Received tab and edit it in place (see the callout under How receiving works). Change the wrong line's received quantity with its stepper, fix a
COSTwith the line's edit link, add a product that never got logged with the Search for a product bar and Add button, or drop a line with its ✕. Click Save, and on-hand adjusts by the difference. If the PO has already moved on toVoucheredorPaid, or you'd rather not touch the original receipt, the older fallback still works: click Duplicate on the received PO to spin up an editable draft pre-filled with the same vendor and lines, set every line you're not correcting to0, key the correction on the rest (a positive quantity if you under-received, negative if you over-received) or add the missing product with the search box, then click Receive directly on the draft (that skips the send-to-vendor step) to post an offsetting corrective receipt. The original PO stays put; the new receipt adjusts on-hand by the delta.
Rundoo doesn't automatically reach out to the vendor when you flag a discrepancy. Call or email them yourself. The receipt records what you got; it's not a dispute mechanism.
After receiving (vouchering)
Once a PO is in the Received tab, it's not done. It's waiting for invoice details before your accounting side can pay it.

Open a received PO and the left panel carries an Invoice section with four fields:
-
Invoice date. The date on the vendor's paper invoice. Drives due-date math and hits GL on that date. -
Due date(when payment is due). Rundoo doesn't auto-compute this from your vendor terms; fill it in from the invoice. -
Invoice Number(the vendor's invoice ID). Required for vouchering; also how you dedupe against the vendor's side. -
Pay to(defaults to the PO's vendor). Change it if the invoice is payable to a parent entity or a different billing address on the same vendor record.
On the right, the Order details panel carries Add fee or discount, a free-form line for freight, early-pay discounts, handling charges, or any other invoice-level adjustment that isn't tied to a single line. Click it, pick Fee or Discount, name it, enter the amount, and the order total rolls up. The same modal lets you spread that charge into each product's per-unit cost (its landed cost) with the Distribute landed cost control, see Landed cost below.
Fill in the invoice fields and click Voucher at the bottom right. Rundoo moves the PO into the Vouchered tab (that's the handoff point to accounting). From there it flows through Vendor invoices on its way to Paid.
The Voucher button stays disabled until all four invoice fields are filled in. Rundoo shows "Complete invoice details before vouchering." next to the button until you do.
Landed cost: spreading freight and surcharges across items
A product's real cost is more than what the vendor charged for the item. Freight, fuel surcharges, and handling land on the invoice as order-level charges, but they're really part of what each unit cost you. Landed cost is Rundoo distributing those order-level charges back across the line items so each product's per-unit cost reflects its true cost (launched October 2026, idea board #774). You no longer have to hand-edit every line's COST to bake freight in.
It's part of the Add fee or discount modal. In the Order details panel of a received PO (or while building a PO), click Add fee or discount, choose Fee or Discount, give it a Name (Freight, BM Surcharge), and enter the Amount. Then pick a Distribute landed cost option:
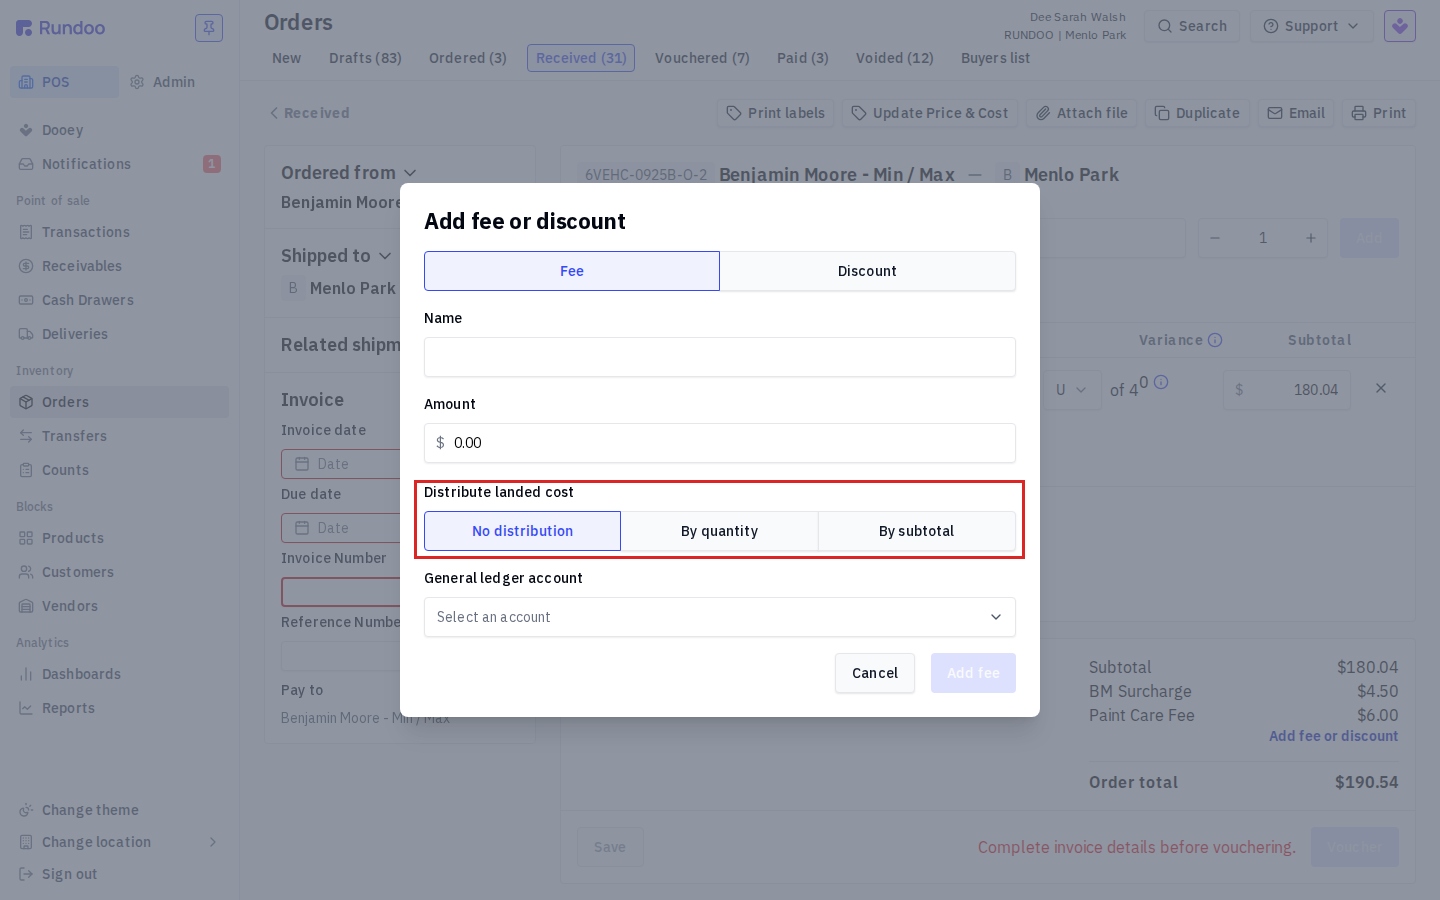
-
No distribution. The charge stays on the order total only. No line's unit cost changes. This is the old behavior, use it for a charge you don't want baked into product cost (for example, a pure freight pass-through you track separately).
-
By quantity. Rundoo spreads the charge evenly across every received unit. $10.50 of fees on 4 units adds $2.625 to each unit's cost, regardless of what each line costs. Best when the charge tracks with units (handling, a flat delivery fee).
-
By subtotal. Rundoo spreads the charge in proportion to each line's dollar value, so a more expensive line absorbs a bigger share of the freight. Best when the charge tracks with value (a percentage surcharge, insurance).
Pick a General ledger account for the charge if you want it to post somewhere specific, then click Add fee.
Once a fee is distributed, the per-unit landed cost shows as a + $X right under each line's COST, and the Order details panel lists the fee by name with its amount. In the example below, a BM Surcharge ($4.50) and a Paint Care Fee ($6.00) are distributed by quantity across 4 units, so the $45.01 line cost carries a + $2.625 landed cost on top.
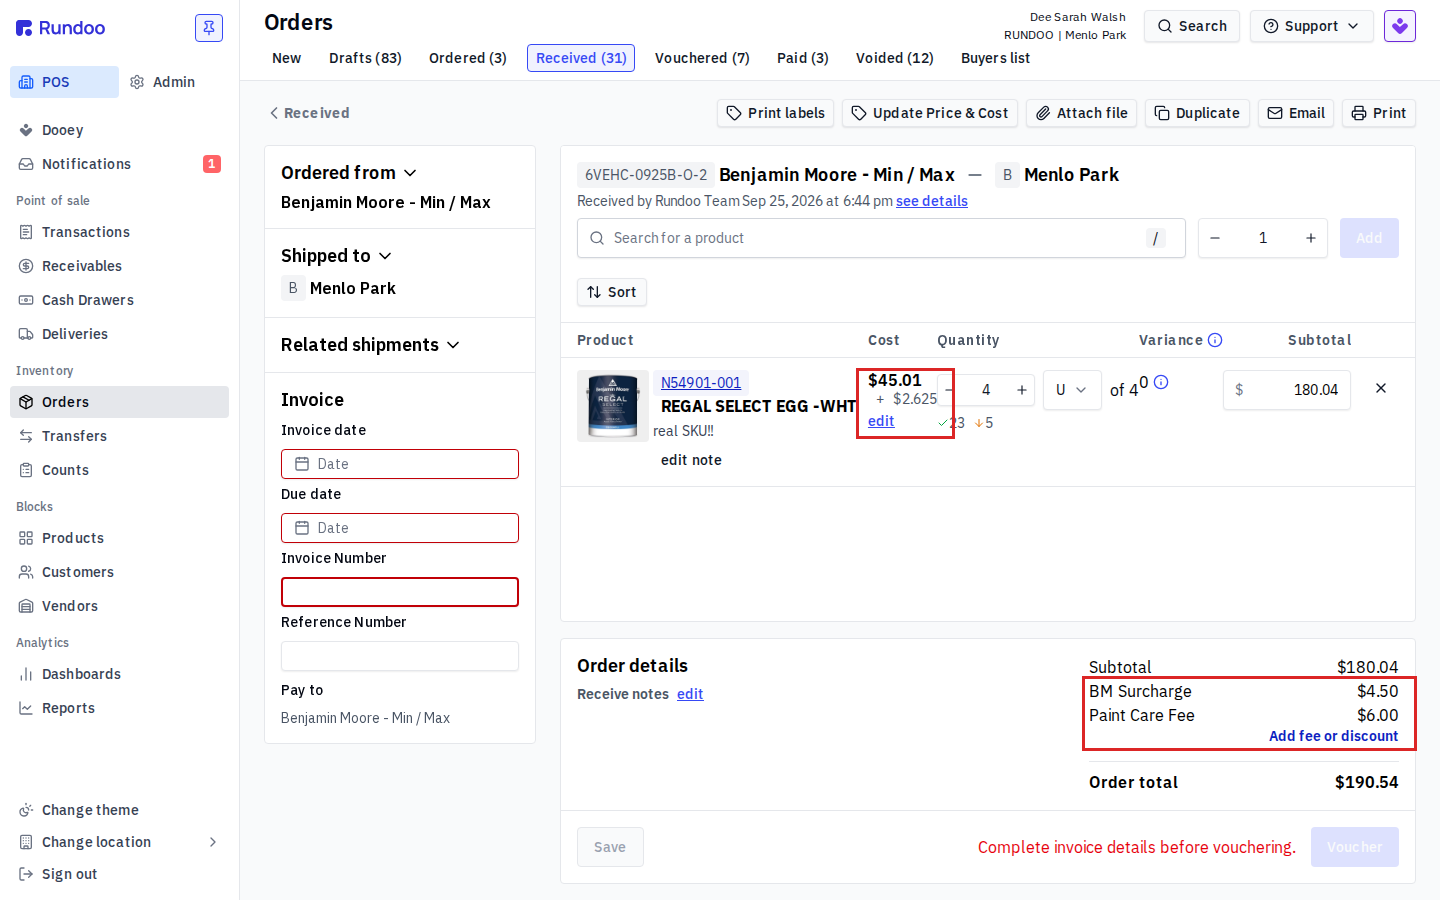
Distributed cost is the product's cost going forward. A distributed landed cost flows through to the GL and into the product's cost, so it affects margins and whatever cost method you run. A line-level COST edit fixes one item's price on this receipt; a distributed fee spreads one order-level charge across many items. Use the line edit for "the vendor billed this item wrong," and landed-cost distribution for "freight/surcharges belong in what these items actually cost me."
Matching an Orgill invoice
An Orgill invoice carries more than product lines. Alongside the merchandise, Orgill bills separate program and service charges, and collects a rebate it pays back to you at year end. Your receipt has to carry each of those so the PO total matches the paper invoice, and they all go in through the same Add fee or discount form, entered as a Fee with No distribution, each pointed at whatever account you want it to hit.
Here's what No distribution does, so you know why it's the right choice for these charges. A Fee posts the amount as a debit to the account you pick and a credit to Accounts Payable (a Discount reverses it: debit AP, credit the account). With No distribution that's all it does, it never touches a single line's item cost. That's exactly right for Orgill's program charges, they're costs of doing business with the distributor, not part of what the merchandise cost you. (Freight is the one line you might choose to distribute instead, By quantity or By subtotal, if you want it worked into landed cost as covered above. The program charges below should not be distributed.)
The lines that typically appear on an Orgill invoice, each entered the same way:
| Invoice line | Enter as | Distribution |
|---|---|---|
| Program Services | Fee | No distribution |
| Stop Charge | Fee | No distribution |
| Price Stickers | Fee | No distribution |
| Delivery or Freight | Fee | No distribution, or distribute to landed cost |
| Advantage Rebate Charges | Fee | No distribution |
The Advantage rebate is the one worth understanding. It's a charge Orgill collects on each invoice and refunds to you at year end, so it's a fee you pay in, not a discount, and it must stay No distribution so it never works its way into product cost. Which account it lands in is your bookkeeper's call: some stores book it to a dedicated expense account, some to COGS, and some to a receivable (since it's money coming back). There's no single right answer here and Rundoo doesn't prescribe one.
No "rebate" category to look under, and that's fine. The Add fee or discount account picker lists every active account in your chart with no grouping, so there's no "rebate" heading, which leads some people to assume rebates aren't supported. They are. You enter the Advantage rebate as a plain Fee pointed at whatever account your bookkeeper wants. If the account you need doesn't exist yet, add it first in Admin > Chart of Accounts > Accounts with Add account (see Chart of accounts), then pick it here.
Early-pay and one-time discounts go on the Discount side. An early-payment discount or a one-time credit on the same Orgill invoice is entered as a Discount (not a Fee), still No distribution, pointed at a purchase-discount account. That debits Accounts Payable and credits the discount account, lowering what you owe without touching item costs.
If you're receiving these shipments over EDI, Orgill EDI → Matching the Orgill invoice points back here from the receiving flow.
Recommended Rundocs
-
Purchase orders (the full PO lifecycle, from drafting through sending to the vendor).
-
Vendor invoices, what vouchered POs become, and how they pay out.
-
Benjamin Moore orders (the BM-specific order flow for paint retailers).